Tuesday August 23rd, 2016
AWS Lambda Image resizing
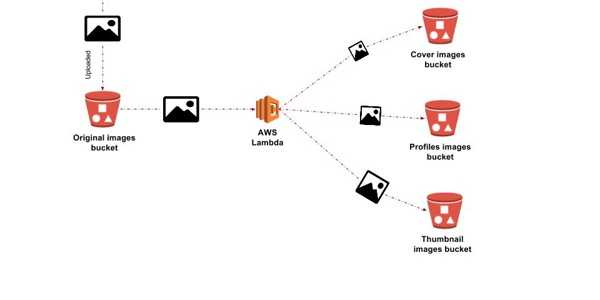
This post will walk you through how you can create different image sizes after you uploaded the origin image to the AWS s3 storage. The goal of this post is to show you how you make use of AWS lambda function which means no servers (EC2 instances) will be required to perform these image resizing tasks. When an image gets uploaded to the original image bucket, the lambda function will get triggered which in turn will resize the image in different sizes e.g profile, cover and thumbnail sizes. Once Lambda is done with the resizing it will upload the different images to their corresponding buckets.
Before we dive into it, let's cover up s3 and Lambda services what are they and what do they do.
S3 storage
![]()
S3 stands for Simple Storage Service which is an internet storage (unlimited storage since you pay as you go). In a nutshell, S3 provides a simple web services interface which you can use to store and retrieve your data (objects) and more important those tasks can be done from anywhere on the web and at any time. Your data so called objects are stored in a container called bucket in s3. When you are creating the bucket, you will have to specify in which AWS region you want the bucket to be created in.
Objects are the data (files) you store in the bucket, and the object is broken down into the actual data you are storing and the metadata which consists of a collection of key-value describing your data.
For more in-depth in s3, please the following link: http://docs.aws.amazon.com/AmazonS3/latest/dev/Introduction.html
Lambda (Serverless)
![]()
As the name serverless indicates, no servers from your side are required. You will basically write your functions in your more preferred programming languages and upload the code to AWS lambda and the lambda service will run your code on your behalf using AWS infrastructure. In a nutshell, AWS Lambda is a compute service. Only these programming languages are supported Python, Java and Node.js and Lambda provides a standard runtime and environment when your code is being ran. Therefore you are only responsible for your code.
Let's talk a bit about not having lambda in a case you want to resize your images when they get uploaded to s3. In this case for example you will want to have a profile, cover and thumbnail image out of the original image. Then you may have to provision a fleet of proxy servers to capture those uploads to the s3 bucket and for each uploads captured you may have a job put in a queue to be processed and maybe there is a second fleet of servers for reading and processing those jobs from the queues. On top of those, you will make sure how many servers you will need and that the servers are coping with the loads and more important you will need to setup the monitoring system for a 24/7 monitoring. On the other hand, with Lambda you only need the function responsible for resizing your image. By having the data trigger event on your original bucket s3, for any upload to the bucket, the original images will be resized in profile, cover and thumbnail image sizes by your lambda function and then they will be uploaded to the corresponding buckets.
Please for more info on AWS Lambda, please visit the following link: http://docs.aws.amazon.com/lambda/latest/dg/welcome.html
Let's get-started by setting up the AWS resources required
S3 Buckets using AWS console
Create four s3 buckets with the following names (You can use any name you want, as note AWS s3 bucket has a global unique name):
- ttrserverlessimages
- ttrserverlessimagescover
- ttrserverlessimagesprofile
- tttrserverlessimagesthumbnail
And for on how to create s3 buckets, please visit the following link: http://docs.aws.amazon.com/AmazonS3/latest/dev/UsingBucket.html
SSH Key-Pair using AWS console
Create an SSH key and you will the private key downloaded. Move the key to your ~/.ssh/ directory and set permission to 600 ($ chmod 600 ~/.ssh/yourprivatekey ). In my case I have created the key pair called tutorial-serverless.pem
Create an Amazon Linux Machine
Launch an EC2 instance (Amazon Linux AMI which I will be using for this tutorial), how to launch an EC2 instance please visit: http://docs.aws.amazon.com/AWSEC2/latest/UserGuide/launching-instance.html. Make sure you assign the SSH key-pair you've generated and choose the appropriate VpcID and subnetID (your subnet chosen should the flag auto-assign public IP enabled).
Those steps above are pretty much manuals using the AWS console, but you may wanna use CloudFormation orTerraform to create all those resources(S3 buckets and EC2 instance) on your behalf. I will be using CloudFormation to automatically create those resources for me. You can also useTerraform to achieve the same goal, for more on Terraform please visit my one of my previous post: http://blog.kaliloudiaby.com/index.php/terraform-to-provision-vpc-on-aws-amazon-web-services.
Make sure you get your default VpcID and subnetID (replace the ones in the python code below with yours) and the subnet flag auto-assign public IP should be enabled.
Before we start there will only one manual step, create the SSH Key-Pair using AWS console. Let's now talk about CloudFormation which is service giving a developers or sysadmin to easily create and manage their collection of AWS resources, CloudFormation as service allow you to adopt the Infrastructure as code concept. All you need to do is to specify the resources in a JSON file called template and upload that to CloudFormation. But for me, I will skip writing the JSON file which can be a bit tedious to maintain or read. I will be using a python library called troposphere which in turn will generate the template for me. These templates can be versioned as well, and just as note all these template developments will be done on your work station, in my case my Mac computer.
Install troposphere
$ pip install troposphereCreate your work directory
$ mkdir image-resizingCreate a python py file image-resize.py
$ cd image-resizing
$ vim image_resize.py
And should content the following python code describing the AWS resources and generating the CloudFormation template
from troposphere import ec2
from troposphere import Ref
from troposphere import Tags
from troposphere import Join
from troposphere import Base64
from troposphere import Template

from troposphere.s3 import Bucket


everyone = '0.0.0.0/0'

SG_rule = ec2.SecurityGroupRule


ingress = [
            SG_rule(IpProtocol='tcp', FromPort=22, ToPort=22, CidrIp=everyone),
            SG_rule(IpProtocol='tcp', FromPort=80, ToPort=80, CidrIp=everyone),
            SG_rule(IpProtocol='tcp', FromPort=443, ToPort=443, CidrIp=everyone)
            ]

egress = [SG_rule(IpProtocol='tcp', FromPort=0, ToPort=65535, CidrIp=everyone)]


amazon_linux_SG = ec2.SecurityGroup('AmazonLinuxMachineSG',
                                    VpcId='vpc-cb0bf3af',
                                    GroupDescription='Allow SSH, HTTP and HTTPS',
                                    SecurityGroupIngress=ingress,
                                    SecurityGroupEgress=egress,
                                    Tags=Tags(Name='AmazonLinuxMachine SG',
                                                Application=Ref('AWS::StackName')))


ec2_instance = ec2.Instance('AmazonLinuxMachine',
                            SecurityGroupIds=[Ref(amazon_linux_SG)],
                            KeyName='tutorial-serverless',
                            InstanceType='t2.micro',
                            InstanceInitiatedShutdownBehavior='stop',
                            DisableApiTermination=True,
                            SubnetId='subnet-d9ed25af',
                            Tags=Tags(Name='Amazon Linux Machine',
                                        Application=Ref('AWS::StackId'),
                                        Details='Created by Cloud Formation'),
                            SourceDestCheck=False,
                            ImageId='ami-f9dd458a',

                            UserData=Base64(Join("", [
                                "#!/bin/bash\n",
                                "yum install python27-devel python27-pip gcc",
                                "yum install libjpeg-devel zlib-devel python-pip"
                                "pip install -U pip",
                                "pip install virtualenv"
                                ]))

                            )


tutorial_images = Bucket('ttrserverlessimages', BucketName="ttrserverlessimages")
tutorial_imagescover = Bucket('ttrserverlessimagescover', BucketName="ttrserverlessimagescover")
tutorial_imagesprofile = Bucket('ttrserverlessimagesprofile', BucketName="ttrserverlessimagesprofile")
tutorial_imagesthumbnail = Bucket('ttrserverlessimagesthumbnail', BucketName="ttrserverlessimagesthumbnail")


if __name__ == '__main__':

    template = Template()
    template.add_version('2010-09-09')
    template.add_description('This is the template describing resources required for this tuto setup')

    template.add_resource(amazon_linux_SG)
    template.add_resource(ec2_instance)
    template.add_resource(tutorial_images)
    template.add_resource(tutorial_imagescover)
    template.add_resource(tutorial_imagesprofile)
    template.add_resource(tutorial_imagesthumbnail)

    with open('template.json', 'w') as fd:
        fd.write(template.to_json(indent=4, sort_keys=True))
Now run the following command to generate the template
$ python image_resize.pyOutput template.json which should content the following below
{
    "AWSTemplateFormatVersion": "2010-09-09",
    "Description": "This is the template describing resources required for this tuto",
    "Resources": {
        "AmazonLinuxMachine": {
            "Properties": {
                "DisableApiTermination": "true",
                "ImageId": "ami-f9dd458a",
                "InstanceInitiatedShutdownBehavior": "stop",
                "InstanceType": "t2.micro",
                "KeyName": "tutorial-serverless",
                "SecurityGroupIds": [
                    {
                        "Ref": "AmazonLinuxMachineSG"
                    }
                ],
                "SourceDestCheck": "false",
                "SubnetId": "subnet-d9ed25af",
                "Tags": [
                    {
                        "Key": "Application",
                        "Value": {
                            "Ref": "AWS::StackId"
                        }
                    },
                    {
                        "Key": "Details",
                        "Value": "Created by Cloud Formation"
                    },
                    {
                        "Key": "Name",
                        "Value": "Amazon Linux Machine"
                    }
                ],
                "UserData": {
                    "Fn::Base64": {
                        "Fn::Join": [
                            "",
                            [
                                "#!/bin/bash\n",
                                "yum install python27-devel python27-pip gcc",
                                "yum install libjpeg-devel zlib-devel python-pippip install -U pip",
                                "pip install virtualenv"
                            ]
                        ]
                    }
                }
            },
            "Type": "AWS::EC2::Instance"
        },
        "AmazonLinuxMachineSG": {
            "Properties": {
                "GroupDescription": "Allow SSH, HTTP and HTTPS",
                "SecurityGroupEgress": [
                    {
                        "CidrIp": "0.0.0.0/0",
                        "FromPort": 0,
                        "IpProtocol": "tcp",
                        "ToPort": 65535
                    }
                ],
                "SecurityGroupIngress": [
                    {
                        "CidrIp": "0.0.0.0/0",
                        "FromPort": 22,
                        "IpProtocol": "tcp",
                        "ToPort": 22
                    },
                    {
                        "CidrIp": "0.0.0.0/0",
                        "FromPort": 80,
                        "IpProtocol": "tcp",
                        "ToPort": 80
                    },
                    {
                        "CidrIp": "0.0.0.0/0",
                        "FromPort": 443,
                        "IpProtocol": "tcp",
                        "ToPort": 443
                    }
                ],
                "Tags": [
                    {
                        "Key": "Application",
                        "Value": {
                            "Ref": "AWS::StackName"
                        }
                    },
                    {
                        "Key": "Name",
                        "Value": "AmazonLinuxMachine SG"
                    }
                ],
                "VpcId": "vpc-cb0bf3af"
            },
            "Type": "AWS::EC2::SecurityGroup"
        },
        "ttrserverlessimages": {
            "Type": "AWS::S3::Bucket"
        },
        "ttrserverlessimagescover": {
            "Type": "AWS::S3::Bucket"
        },
        "ttrserverlessimagesprofile": {
            "Type": "AWS::S3::Bucket"
        },
        "ttrserverlessimagesthumbnail": {
            "Type": "AWS::S3::Bucket"
        }
    }
}
Now that the template is done, go to AWS console --> CloudFormation service and create the stack. After you've done with the stack creation, you should see something similar below

I assume everything is setup, awesome. And you should see the following resources created.
EC2 instance Amazon Linux Machine

Subnet, this was not created by CloudFormation but this is where you can get the subnetID subnet-d9ed25af

VPC, this was not created by CloudFormation but this is where you can get the VpcID Vpc-cb0bf3af

The SSH Key-Pair tutorial-serverless

The private key downloaded in my computer

S3 Buckets

Let's get-started by setting up the AWS Lambda function
Now that we have everything we need setup, let's start implementing our lambda function. Since it will be a python code, we will the Amazon linux machine (EC2 instance) where the function will be implemented and packaged and then uploaded to AWS Lambda.
SSH to the Amazon linux machine (EC2 instance using the public IP)
First add the private key
$ ssh-add ~/.ssh/tutorial-serverless.pemNow SSH to theAmazon linux machine (EC2 instance)
$ ssh ec2-user@54.171.54.71Now you should be logged in on the machine
Install this RPM packages
$ sudo yum install python27-devel python27-pip gcc libjpeg-devel zlib-develCreate and activate a python environment
$ virtualenv image-resize
$ cd image-resize
$ source bin/activate
Install the following python package dependencies
$ pip install python-resize-image
$ pip install Pillow
$ pip install boto3
Now that the dependencies are installed, let's write the image resizing function
$ vim image-resize.pyAnd should contain the following below
from __future__ import print_function

import boto3

import os
import sys
import uuid

from PIL import Image
import PIL.Image
from resizeimage import resizeimage

COVER_SIZE = [200, 150]
PROFILE_SIZE = [200, 200]
THUMBNAIL_SIZE = [250, 250]


s3_client = boto3.client('s3')

def image_cover(image_source_path, resized_cover_path):

    with Image.open(image_source_path) as image:
        cover = resizeimage.resize_cover(image, COVER_SIZE)
        cover.save(resized_cover_path, image.format)


def image_profile(image_source_path, resized_cover_path):

    with Image.open(image_source_path) as image:
        profile = resizeimage.resize_cover(image, PROFILE_SIZE)
        profile.save(resized_cover_path, image.format)


def image_thumbnail(image_source_path, resized_cover_path):

    with Image.open(image_source_path) as image:
        thumbnail = resizeimage.resize_thumbnail(image, THUMBNAIL_SIZE)
        thumbnail.save(resized_cover_path, image.format)


def handler(event, context):

    for record in event['Records']:
        bucket = record['s3']['bucket']['name']
        key = record['s3']['object']['key']
        download_path = '/tmp/{}{}'.format(uuid.uuid4(), key)
        upload_path_cover = '/tmp/resized-{}'.format(key)
        upload_path_profile = '/tmp/resized-{}'.format(key)
        upload_path_thumbnail = '/tmp/resized-{}'.format(key)

        s3_client.download_file(bucket, key, download_path)

        image_cover(download_path, upload_path_cover)
        s3_client.upload_file(upload_path_cover, '{bucket_name}cover'.format(
                                                                    bucket_name=bucket),
                                                                    'cover-{key}'.format(key=key))

        image_profile(download_path, upload_path_cover)
        s3_client.upload_file(upload_path_cover, '{bucket_name}profile'.format(
                                                                        bucket_name=bucket),
                                                                        'profile-{key}'.format(key=key))

        image_thumbnail(download_path, upload_path_thumbnail)
        s3_client.upload_file(upload_path_thumbnail, '{bucket_name}thumbnails'.format(
                                                                              bucket_name=bucket),
                                                                              'thumbnail-{key}'.format(key=key))
Now we will start packaging the code and then upload it to AWS Lambda
$ zip -r9 ~/image_resize.zip lib/python2.7/site-packages/*
$ zip -r9 ~/image_resize.zip lib64/python2.7/site-packages/*
$ zip -g ~/image_resize.zip image_resize.py
Now you should have a zip file in the home folder $ ls ~/
In order to be able to upload the Lambda function, we will install awscli (aws command lines)
$ pip install awscliBefore using the awscli, we need to create the credentials and config files under ~/.aws since awscli and the python library boto3 will using those file for authentication with AWS for creating and managing resource on our behalf.
$ mkdir ~/.aws$ vim ~/.aws/configAnd should contain
[default]
region=eu-west-1
output = json
$ vim ~/.aws/credentialsAnd should contain
[default]
aws_access_key_id = your_access_key
aws_secret_access_key = your_secret_access_key
Create a new role called lambda-image-resize-s3 in the AWS IAM, in the select role type choose AWS Service Roles and then choose AWS Lambda . And at last in the Attach Policy choose AWSLambdaExecute and remember the Role ARN, you will need it later on.
Let's now upload the zip file to AWS lambda using awscli (change the Role ARN arn:aws:iam::random_number:role/lambda-image-resize-s3 to the correct one from your AWS console in the IAM section)
$ aws lambda create-function \
--region eu-west-1 \
--function-name image_resize \
--zip-file fileb:///home/ec2-user/image_resize.zip \
--role arn:aws:iam::random_number:role/lambda-image-resize-s3 \
--handler image_resize.handler \
--runtime python2.7 \
--timeout 30 \
--memory-size 1535
You should be able now to see the Lambda function image_resize on AWS Lambda

In order to test, upload an image to s3 bucket ttrserverlessimages , I will upload an image kalilou.jpg

Now we will test our Lambda function by triggering manually. Before that let's have some test data. Create the test data file $ vim image-resize/input.txt and should contain the following.
{
    "Records":[
        {
            "eventVersion":"2.0",
            "eventSource":"aws:s3",
            "awsRegion":"us-west-2",
            "eventTime":"1970-01-01T00:00:00.000Z",
            "eventName":"ObjectCreated:Put",
            "userIdentity":{
            "principalId":"AIDAJDPLRKLG7UEXAMPLE"
            },
            "requestParameters":{
            "sourceIPAddress":"127.0.0.1"
            },
            "responseElements":{
            "x-amz-request-id":"C3D13FE58DE4C810",
            "x-amz-id-2":"FMyUVURIY8/IgAtTv8xRjskZQpcIZ9KG4V5Wp6S7S/JRWeUWerMUE5JgHvANOjpD"
            },
            "s3":{
            "s3SchemaVersion":"1.0",
            "configurationId":"testConfigRule",
            "bucket":{
                "name":"ttrserverlessimages",
                "ownerIdentity":{
                    "principalId":"A3NL1KOZZKExample"
                },
                "arn":"arn:aws:s3:::ttrserverlessimages"
            },
            "object":{
                "key":"kalilou.jpg",
                "size":40787,
                "eTag":"c54a53de7c1b8d36519319860263d9b9",
                "versionId":"096fKKXTRTtl3on89fVO.nfljtsv6qko"
            }
            }
        }
    ]
}
Now trigger the Lambda function manually by passing this data above.
$ aws lambda invoke \
--invocation-type Event \
--function-name image_resize \
--region eu-west-1 \
--payload file:///home/ec2-user/image-resize/input.txt outputfile.txt
Now you should be able to see that the image has been resized in different formats and then uploaded to the corresponding s3 buckets (ttrserverlessimagescover, ttrserverlessimagesprofile and ttrserverlessimagesthumbnail)
Let's now put a data event trigger on the S3 bucket ttrserverlessimagescover which basically means whenever an image is being uploaded, the Lambda function will be triggered which in turn will resize the image in different formats (cover, profile and thumbnail sizes) and then upload them to the corresponding buckets (ttrserverlessimagescover, ttrserverlessimagesprofile and ttrserverlessimagesthumbnail)
Now let's add the permission to grant S3 to trigger the Lambda function. Run the following command
$ aws lambda add-permission \
--function-name image_resize \
--region eu-west-1 \
--statement-id 8542569714 \
--action "lambda:InvokeFunction" \
--principal s3.amazonaws.com \
--source-arn arn:aws:s3:::ttrserverlessimages
Next, Configure Notification on the bucket ttrserverlessimages , go to the bucket on s3 and as for event type choose ObjectCreate (All). If that's done, now you should be able to notice whenever you upload an image to the bucket ttrserverlessimages , images (cover, profile and thumbnail) are uploaded to the buckets (ttrserverlessimagescover, ttrserverlessimagesprofile and ttrserverlessimagesthumbnail) .