Tuesday July 26th, 2016
Opscode Chef
In this post, I will be explaining Chef common terminology followed by some practical example on how to deal with those concepts. In a nutshell, this post will involve an implicit tutorial along the line.
Code on GitHub: https://github.com/kalilou/chef-tutorial
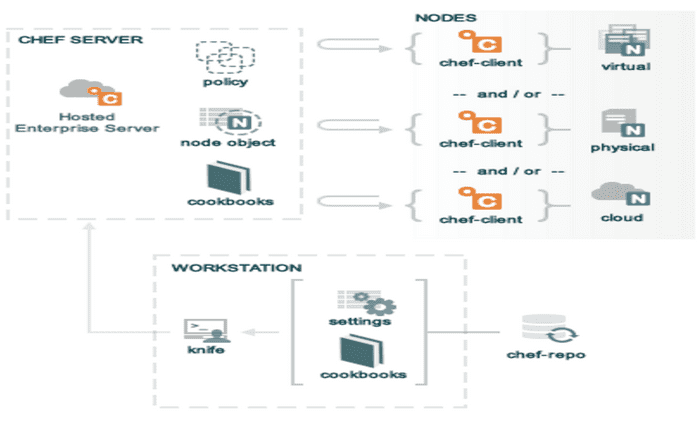
![]() Chef is a Server Configuration Management, an automation platform from Opscode, and it is one of the popular Configuration tools which is built in Ruby. Chef is built on a Server/Client architecture, Chef Client runs on your systems which is called a node, a node can be a PostgreSQL Server, your Application Server, a Loadbalancer Server and so on. A** Chef Server **is a centralized storage for the configuration recipes (called policies), cookbooks, environments and nodes. For example if you would like to install a PostgreSQL server, you run the Chef Client on the PostgreSQL server and the Chef Client will load and compile the recipes (which describes for example how to install and configure a Redis Server).
Chef is a Server Configuration Management, an automation platform from Opscode, and it is one of the popular Configuration tools which is built in Ruby. Chef is built on a Server/Client architecture, Chef Client runs on your systems which is called a node, a node can be a PostgreSQL Server, your Application Server, a Loadbalancer Server and so on. A** Chef Server **is a centralized storage for the configuration recipes (called policies), cookbooks, environments and nodes. For example if you would like to install a PostgreSQL server, you run the Chef Client on the PostgreSQL server and the Chef Client will load and compile the recipes (which describes for example how to install and configure a Redis Server).
Chef-managed Infrastructure Landscape
Workstation
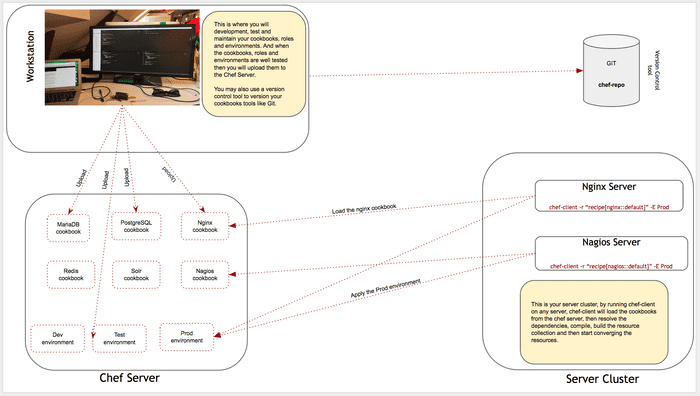
The workstation is where you will be writing your Chef cookbooks, recipes, roles and environments and upload them to the Chef Server by the using Chef CLI called knife, you can also version them by using Git or other version control tools. The workstation can be your Mac, Ubuntu, Centos or Window computer, in my case I am using a Mac computer. Don't worry if you don't understand cookbooks, recipes, roles or environments, I will covers them as we go along the tutorial, this is just to give a big picture on Chef infrastructure. Now Let's setup the workstation by downloading Chef Development Kit (ChefDK). Please go to https://downloads.chef.io/chef-dk/ and download the correct package for your Operating System.
I will assume you have already downloaded and installed ChefDK. Run the following command to make the ChefDK is properly installed.
$ chef verify

Output
Running verification for component 'berkshelf'
Running verification for component 'test-kitchen'
Running verification for component 'tk-policyfile-provisioner'
Running verification for component 'chef-client'
Running verification for component 'chef-dk'
Running verification for component 'chef-provisioning'
Running verification for component 'chefspec'
Running verification for component 'rubocop'
Running verification for component 'fauxhai'
Running verification for component 'knife-spork'
Running verification for component 'kitchen-vagrant'
Running verification for component 'package installation'
Running verification for component 'openssl'
................................................
---------------------------------------------
Verification of component 'rubocop' succeeded.
Verification of component 'kitchen-vagrant' succeeded.
Verification of component 'openssl' succeeded.
Verification of component 'test-kitchen' succeeded.
Verification of component 'fauxhai' succeeded.
Verification of component 'berkshelf' succeeded.
Verification of component 'chef-dk' succeeded.
Verification of component 'knife-spork' succeeded.
Verification of component 'tk-policyfile-provisioner' succeeded.
Verification of component 'chefspec' succeeded.
Verification of component 'chef-client' succeeded.
Verification of component 'chef-provisioning' succeeded.
Verification of component 'package installation' succeeded.
Now make sure to use the ruby version coming with the ChefDK, check the ruby path which should return /opt/chefdk/embedded/bin/ruby
$ which rubyIf not /opt/chefdk/embedded/bin/ruby , then fix it by running the following command
For bash terminal
$ echo 'eval "$(chef shell-init bash)"' >> ~/.bash_profileReload the terminal
$ source ~/.bash_profileCheck the ruby version again
$ which ruby
/opt/chefdk/embedded/bin/ruby
For Zsh terminal
echo 'eval "$(chef shell-init zsh)"' >> ~/.zshrcFor this tutorial, I will not be using any Chef Server instead I will be using chef kitchen to test and running chef locally by using vagrant and VirtualBox, for more information on Chef Server and knife configuration check out https://docs.chef.io/
Chef Server
Chef server is coming in two flavors, either you setup your own Chef server or you use the hosted-Chef server which a service provided by Opscode, you can use hosted chef for free which eventually limited to 5 nodes. Chef server is where you will be storing your cookbooks, environments, roles and data bags. The client client will be using those cookbooks, roles and environments from the chef server to install and configure your servers.
Chef Client
Chef client is an agent which runs locally on your servers (nodes). When you run chef-client on a machine the following steps will be undertaken:
- It will start building the node(system level information on your server such us hostname, Operation System and so on) and chef-client will use a utility called ohai.
- chef-client will initiate the authentication process with the chef-server
- chef-client will synchronize the cookbooks from the chef server
- chef-client will then load those cookbooks into memory (I like calling it the process space)
- chef-client will then converge the policies defined in the cookbooks (it will bring the server to the desired state)
Common Chef Terminology
Cookbooks
Cookbooks are unit of configuration, collection of policies required to bring a node (server) to a desired state. Cookbook can handle a specific service or application. Cookbook consists of recipes, files, attributes, libraries, metadata, providers, templates and resources, here is an example of a cookbook structure and each component will be explain along the way:
├── CHANGELOG.md
├── README.md
├── attributes
├── definitions
├── files
│   └── default
├── libraries
├── metadata.rb
├── providers
├── recipes
│   └── default.rb
├── resources
└── templates
    └── default
Create a folder called chef-repo and inside create a folder called cookbooks in which will reside all your cookbooks
$ mkdir -p chef-repo/cookbooksYou can use the knife command to create a cookbook on your workstation:
$ cd chef-repo/cookbooks
$ knife cookbook create database-cookbooks -o .  # -o indicates the location where you wanna the database-cookbook to reside in.
** Creating cookbook database-cookbook in /Users/kaldia/Projects/chef-repo/cookbooks
** Creating README for cookbook: database-cookbook
** Creating CHANGELOG for cookbook: database-cookbook
** Creating metadata for cookbook: database-cookbook
Once you've created the database-cookbook, run the following command and you should see the structure below:
cd database-cookbook
$ tree
.
├── CHANGELOG.md
├── README.md
├── attributes
├── definitions
├── files
│ └── default
├── libraries
├── metadata.rb
├── providers
├── recipes
│ └── default.rb
├── resources
└── templates
    └── default
You can also find cookbooks which are already written by the chef community, for example if you would like to install PostgreSQL or Redis, you don't need to write everything from scratch, you can just use those cookbooks which can be found https://supermarket.chef.io/. To use to cookbooks from the community, all you need to do is to define them in your cookbook metadata.rb file which is covered below.
Metadata.rd
The metadata.rb file in the cookbook contains information such as the cookbook name, the maintainer name, the maintainer email, license, description and version of the cookbook. And more important, this file manages the dependencies of other recipes, for example let's say you would like to use some cookbooks inside this cookbook then which means this cookbook depends on those cookbooks, therefore you need that information in the metadata.rb file. Let's modify the metadata.rb in the database-cookbook directory by adding the redis2 cookbook.
vim chef-repo/cookbooks/database-cookbook/metadata.rbShould contains the following:
name 'database-cookbook'
maintainer 'Kalilou Diaby'
maintainer_email 'you@example.com'
license 'all rights reserved'
description 'Installs/Configures database'
long_description 'Installs/Configures database (redis, postgresql)'
version '0.1.0'

depends 'redis2', '~> 0.5.1'
On line 9 above, Chef will download redis2 cookbook through Berkshell which will cover later on in this post. In summary, in our cookbook database-cookbook, I will be installing and configuring Redis, so in order to not write everything from scratch, I will use the external cookbooks redis2, this cookbook will do most of the work for me.
Attributes
Attributes are specific details about the node (which is your physical or virtual server). Attributes can be used to override some of the values, for example in our case, we will override some of the attributes which came from redis2 external cookbook, you can also use attributes inside a recipe and you can also specify your own attributes which can access inside your recipe. For example, I will say the redis bind address will be 0.0.0.0 , port 6379 , for redis data_dir attribute, I will override it with /opt/tutorial/data/redis . These values will override the default values from redis2 external cookbok. Now let's create an attribute file.
$ vim chef-repo/cookbooks/database-cookbook/attributes/default.rbShould contain the following.
# Override these attributes from redis2 external cookbook
# These also defined in redis2 external cookbook with some values
# but in our case we want some specific values different from the default ones coming with redis2

default['redis2']['instances']['master']['data_dir'] = '/opt/tutorial/data/redis'
default['redis2']['instances']['master']['replication'] = 'master'
default['redis2']['instances']['master']['bindaddress'] = '0.0.0.0'
default['redis2']['instances']['master']['port'] = '6379'
Recipes
Recipes are configuration files describing the desired state of your resources, in another word, recipe describe the desired state of you server by installing and configuring packages, managing, copying , overwriting files, deploying packages and so on. For example, you have PostgreSQL recipe in which you will define how to install Postgres server and client, how to configure some of the files such as pg_hba.conf or postgresql.conf an so on. You can also include recipes in another recipes, just like in some programming language where you can import your modules. Chef also have recipes already written from the chef community, check out the following to discover those recipes: https://supermarket.chef.io/. Basically, a recipe is a collection of resources which are coming with Chef, they are built-in in Chef which you can use to describe your policies (the desired state). You can also implement some custom resources in Chef if needed which can be HWRP (HeavyWeight Resources and Provider) or LWRP **(LightWeight **Resources and Provider), let's see some built in Chef resources below and Chef resources are more than just the ones above, for more on Chef resource, please visit the following link: https://docs.chef.io/resource.html. Let's create some recipes in the database-cookbook.
$ vim chef-repo/cookbooks/database-cookbook/redis_recipe.rbAnd the file should contain the following resources
#
# Cookbook Name:: database-cookbook
# Recipe:: redis_recipe
#

# Create the redis data directory via directory resource
# This node['redis2']['instance']['master']['data_dir'] is defined in your attributes/default.rb file
# as default['redis']['instance']['master']['data_dir], you simple replace default with node when
# you use an attribute variable inside a recipe
directory node['redis2']['instances']['master']['data_dir'] do
    mode 0750
    owner 'root'
    group 'root'
    recursive true
    action :create
end

# This will include the redis2 recipes default and auto
include_recipe 'redis2::default'
include_recipe 'redis2::auto'

# Start Redis service via service resource
service 'redis' do
    action [ :enable, :restart]
end
Environments
Environments represent the life stages of your application. Chef covers your patterns and workflow by providing a way of helping you with environments such as Development, Test, Stage and Production environment. And Chef also provides by default a default environment called _default. Environments can have data attributes which are specific to that environment, for example test and prod environments may have different cookbook versions. Environment can also contain your defined variable which you use inside your recipes. Let's see an example.
Test environment
In the test environment for example, you will overwrite attributes defined in the attributes/default.rb, in my case I will overwrite the redis data_dir attribute with a value specific for my test environment "/opt/test/data/redis" and I will use the redis2 0.5.1 cookbook version.
{
  "name": "test",
  "description": "Test environment",
  "default_attributes": {

    // This will overwrite the default variables declared
    // in the attributes/default.rb for the test environment
    "redis2": {
        "instances": {
          "master": {
            "data_dir":  "/opt/test/data/redis",
            "replication": "master",
            "bindaddress": "0.0.0.0",
            "port": "6379"
          }
        }
    }
  },

  // Use the redis2 0.5.1 cookbook version for test environment
  "cookbook_versions": {
    "redis2": "= 0.5.1"
  },

  "json_class": "Chef::Environment",
  "chef_type": "environment"
}
Production environment
Unlike the test environment, in my prod environment, the redis2 data_dir will be /opt/prod/data/redis" and the redis2 cookbook version will be 0.5.0
{
  "name": "prod",
  "description": "Prod environment",
  "default_attributes": {

    // This will overwrite the default variables declared
    // in the attributes/default.rb for the prod environment
    "redis2": {
        "instances": {
          "master": {
            "data_dir":  "/opt/prod/data/redis",
            "replication": "master",
            "bindaddress": "0.0.0.0",
            "port": "6379"
          }
        }
    }
  },

  // Use the redis2 0.5.0 cookbook version for prod environment
  "cookbook_versions": {
    "redis2": "= 0.5.0"
  },

  "json_class": "Chef::Environment",
  "chef_type": "environment"
}
Roles
Roles are used for example to classified your different type of servers such as database server, search server, log server, application server or loadbalancer and so on. A role contains policies that need to be applied to a specific server. For example, let's say you wanna spin up multiple instances of your PostgreSQL server, you can use a role (PostgreSQL role) to run on those server which will give the same identical PostgreSQL server.
Nodes
Nodes are used to represent physical or virtual servers on your infrastructure. A node can only be associated with one environment but can have many roles. For example, you would to setup a DB server running PostgreSQL, Redis and MongoDB, then you may have the PostgreSQL role, Redis role and MongoDB role which can all be associated the DB node (DB server) which can also be a role called DBrole containing the PostgreSQLrole, Redisrole and MongoDBrole in its run-list.
Kitchen Test
Kitchen Test is used in Chef to automatically test your cookbook and it is out of the boxe when you've installed the ChefDK, I will use kitchen test to test my database-cookbook locally. Kitchen will spin up a virtual machine via vagrant.
Initialize kitchen
cd chef-repo/cookbooks/database-cookbookkitchen initYou should have a .kitchen.yml with the following default content.
---
driver:
  name: vagrant

provisioner:
  name: chef_solo

platforms:
  - name: ubuntu-14.04
  - name: centos-7.1

suites:
  - name: default
    run_list:
      - recipe[database-cookbook::default]
    attributes:
Let's modify it for our cookbook database-cookbook.
---
driver:
  name: vagrant

provisioner:
  name: chef_zero

# Use CentOS 7
platforms:
  - name: centos-7.1

suites:
  - name: default
    run_list:
      - recipe[database-cookbook::default]
    attributes:
Now before, we begin with the testing, let's include the redis_recipe in the default recipe $ vim cookbook-database/recipes/default.rb
#
# Cookbook Name:: database-cookbook
# Recipe:: default
#

include_recipe 'database-cookbook::redis_recipe'
Now run this command inside the database-cookbook folder which will show the list of suites defined in the .kitchen.yml file, suites are virtual machines on which you will be testing your recipes.
$ kitchen listOutput
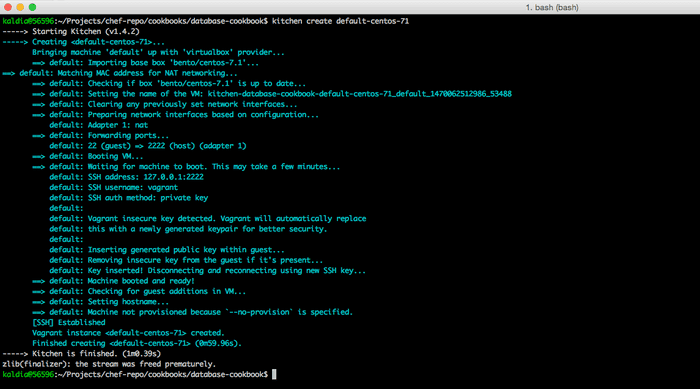
Let's create the suite (VM) default-centos-71 by running $ kitchen create default-centos-71 and then you will see the output below.
Before converging the node, let's initialize Berkshelf which a tool for maintaining your cookbook dependencies and also download your external cookbook defined in the metadata.rb, in our case Berkshelf will download the redis2 cookbook defined in the metadata.rb
$ berks initOutput
Make sure to type 'n' to avoid overwriting your .kitchen.yml
Now running the following command to download all external cookbooks defined in the metadata.rb
$ berks installOutput
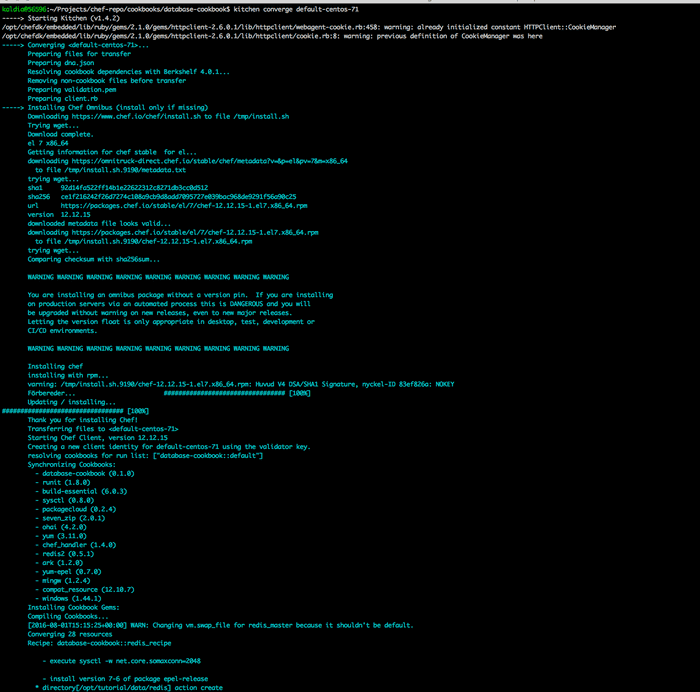
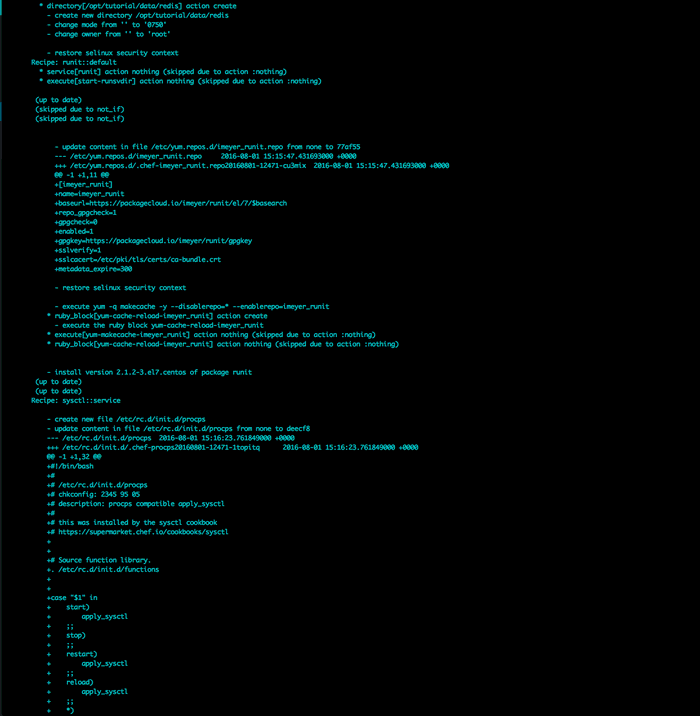
Now that the virtual machine is created and Berkshelf is initialized, let's converge by running the command $ kitchen converge default-centos-71 which will run the chef-client inside the VM to install and configure our redis server (it will run the redis_recipe imported inside the default recipe), you should see the following output (I will be able to show a chunk of the output) .
There are more output than the one above.
Now redis should be installed and configured, to confirmed that let's ssh to the virtual machine and check it out by running $ ps aux | grep redis .
$ kitchen login default-centos-71Output
Hope this tutorial will be helpful :)

