Friday July 15th, 2016
Bootstrap a CI with Puppet
In this tutorial, we will spin up a Jenkins, Build, PostgreSQL and Redis server only by using Puppet which will provision them. Before we dive in, let's cover a bit Puppet, what is Puppet and how does Puppet work?
GitHub: https://github.com/kalilou/puppet-example
Puppet like Ansible (you can check out my post on Ansible here Bootstrap a CI 'Continuous Integration' with Ansible) is a Configuration Management tool which helps sysadmin, DevOps or anyone to automate configuration, provisioning and Infrastructure management. Puppet is available in Enterprise and Open Source but we will be using the Open Source, puppet also runs on most linux distribution, UNIX platform and Window. The Puppet architecture relies on a master/agent or (client/server) architecture for your system configurations** **
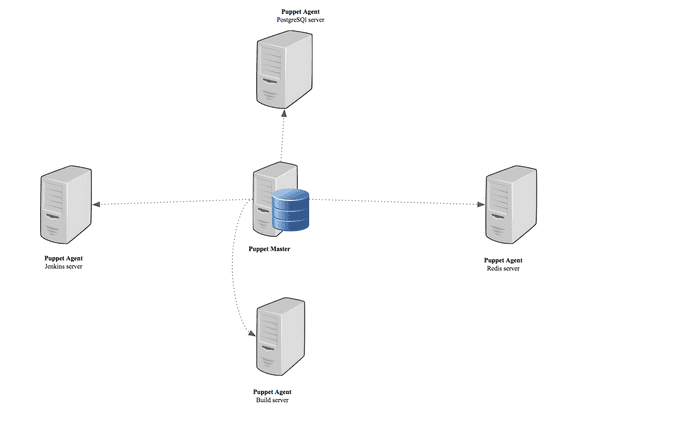
Puppet Architecture
How does Puppets works
As you can see on the picture, we have an agent/master architecture where the puppet master server contains the** Catalog **which is a document containing policies which in turn describes the desired state of a given puppet agent for example the puppet master server will contain a document containing the code on how to install and configure PostgreSQL.
In our case, the puppet master server will have Catalog containing policies on how to install and configure a Jenkins , Build, Redis and PostgreSQL server. Basically if we were to install and configure the PostgreSQL server, we will ssh to the PostgreSQL server and run “puppet agent --test” which will be ran as follow:
- The agent will send the facts on the machine such as OS type, hostname, IP address (Like the CHEF OHAI for people familiar with CHEF) to the puppet master and requests a Catalog.
- The puppet master will compile and return the catalog
- The puppet agent once the catalog is received then it will start applying the policies (And the policies describe how to provision the machines for example how to install and configure PostgreSQL)
Puppet master and Puppet agent communication
Puppet master will act as a certificate authority for managing SSL certificates for the puppet agents, so both communicate via HTTPS with client verification. Agents will automatically request certificates via the puppet master's HTTP API, as sysadmin or DevOps, you will have to sign those certificates on the puppet master server and then the puppet agent servers will be able to download those signed certificates. We see those more in-depth in the rest of the tutorial.
Let's get-started
you can also download the code source from github
$ git clone https://github.com/kalilou/puppet-exampleOr you can also start from scratch. Then, create a folder called puppet-example
$ mkdir puppet-example
$ cd puppet-example
Now let's use vagrant to create the Virtual Machines (VMs) - Puppet master, Jenkins server, Build server, PostgreSQL server and Redis server. Create a file name Vagrantfile which will contain the following code.
# -*- mode: ruby -*-
# vi: set ft=ruby :

VAGRANTFILE_API_VERSION = "2"

Vagrant.configure(VAGRANTFILE_API_VERSION) do |config|


    config.vm.define :puppet_master do |puppet_master_config|
        puppet_master_config.vm.box = "centos/7"
        puppet_master_config.vm.hostname = "puppet"
        puppet_master_config.vm.network "private_network", ip: "192.168.50.200"
        puppet_master_config.vm.synced_folder ".", "/home/vagrant/sync", disabled: true
        puppet_master_config.vm.synced_folder "./code", "/etc/puppetlabs/code", :type => "nfs"
        puppet_master_config.ssh.forward_agent = true
        puppet_master_config.ssh.insert_key = false
        puppet_master_config.ssh.private_key_path = ["~/.vagrant.d/insecure_private_key" ]

        puppet_master_config.vm.provider "virtualbox" do |vb|
            vb.memory = 2048
        end

    end

    config.vm.define :jenkins_server do |jenkins_server_config|
        jenkins_server_config.vm.box = "centos/7"
        jenkins_server_config.vm.hostname = "jenkins-server"
        jenkins_server_config.vm.network "private_network", ip: "192.168.50.201"
        jenkins_server_config.vm.synced_folder ".", "/home/vagrant/sync", disabled: true
        jenkins_server_config.ssh.forward_agent = true
        jenkins_server_config.ssh.insert_key = false
        jenkins_server_config.ssh.private_key_path = ["~/.vagrant.d/insecure_private_key" ]

    end

    config.vm.define :build_server do |build_server_config|
        build_server_config.vm.box = "centos/7"
        build_server_config.vm.hostname = "build-server"
        build_server_config.vm.network "private_network", ip: "192.168.50.202"
        build_server_config.vm.synced_folder ".", "/home/vagrant/sync", disabled: true
        build_server_config.ssh.forward_agent = true
        build_server_config.ssh.insert_key = false
        build_server_config.ssh.private_key_path = ["~/.vagrant.d/insecure_private_key" ]
    end

    config.vm.define :postgres_server do |postgres_server_config|
        postgres_server_config.vm.box = "centos/7"
        postgres_server_config.vm.hostname = "postgresql-server"
        postgres_server_config.vm.network "private_network", ip: "192.168.50.203"
        postgres_server_config.vm.synced_folder ".", "/home/vagrant/sync", disabled: true
        postgres_server_config.ssh.forward_agent = true
        postgres_server_config.ssh.insert_key = false
        postgres_server_config.ssh.private_key_path = ["~/.vagrant.d/insecure_private_key" ]
    end

    config.vm.define :redis_server do |redis_server_config|
        redis_server_config.vm.box = "centos/7"
        redis_server_config.vm.hostname = "redis-server"
        redis_server_config.vm.network "private_network", ip: "192.168.50.204"
        redis_server_config.vm.synced_folder ".", "/home/vagrant/sync", disabled: true
        redis_server_config.ssh.forward_agent = true
        redis_server_config.ssh.insert_key = false
        redis_server_config.ssh.private_key_path = ["~/.vagrant.d/insecure_private_key" ]
    end

end
In line 14 on the code above puppet_master_config.vm.synced_folder "./code", "/etc/puppetlabs/code", :type => "nfs", since we will be developing some more codes such as puppet catalogs, they will be stored under the path "/etc/puppetlabs/code" on the puppet master server, so vagrant will synchronize this folder with the folder on my machine (MacOX), all changes made by me in my editor (Sublime, Atom, Vim) will be synchronize on the remote puppet server folder under "/etc/puppetlabs/code" . Very important to keep the development process smooth.
On how to install vagrant check my post: Bootstrap a CI (Continuous Integration) with Ansible
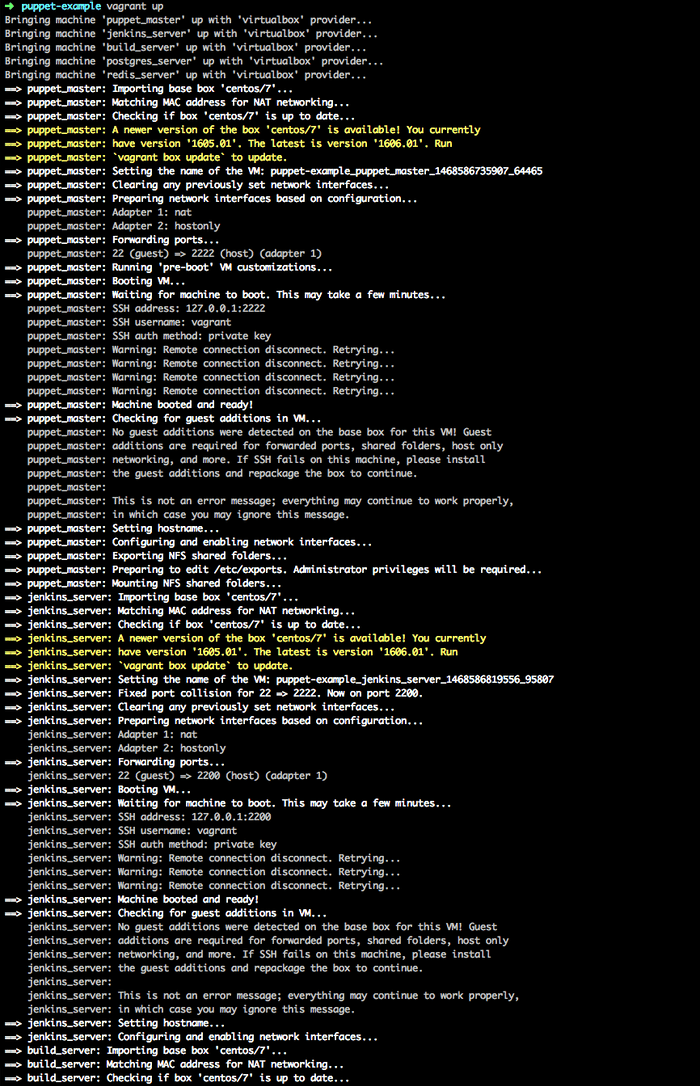
Now, let's spin up the five VM machines with vagrant by running $ vagrant up and you should see the following output (this is just sample):
Now that all machines are up, let's configure the Puppet master machine. Before we start installing it, we will have to edit the "/etc/hosts" file for name resolution on the puppet master server since we will not have any DNS settings.
Install and Configure Puppet Server
SSH to the puppet master machine
$ vagrant ssh puppet_master or you can also ssh directly
$ ssh-add ~/.vagrant.d/insecure_private_key
$ ssh vagrant@192.168.50.200 # IP address of the puppet master server, defined in the Vagrantfile, line 12
Once we on the puppet master machine, let's make sure the port 8140 is not restricted by the firewall and now we need to setup the timezone which is really important since as I mentioned above the Puppet master server will act as a certificate authority so therefore it is important to have the same time on both puppet master and puppet agents in order to prevent problem like the ssl certificate expired if there is a time discrepancies.
We will install NTP (Network Time Protocol) to synchronize the time to the NTP pool zone which should be chosen based on the closest to my machine. More on NTP pool zones checkout out NTP POOL ZONES
Select your timezone, run the following command to list all timezone
$ timedatectl list-timezonesSet your timezone, in my case it's "Europe/Stockholm"
$ sudo timedatectl set-timezone Europe/StockholmInstall NTP
$ sudo yum -y install ntpSynchronize the time using ntpdate
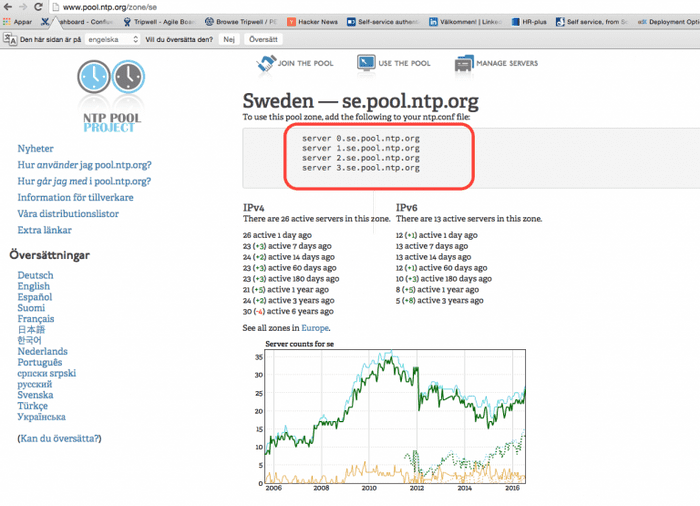
$ sudo ntpdate pool.ntp.orgNow edit the "/etc/ntp.conf" by replacing the server (ntp pool zones) of your choice. To help go to NTP POOL ZONES and choose your location, in my case it will be Europe/Sweden
In the file, remove the default value and replace them with the closest pool to your machines, in the case, the ones on the image above. Look for the default value which are:
server 0.centos.pool.ntp.org iburst
server 1.centos.pool.ntp.org iburst
server 2.centos.pool.ntp.org iburst
server 3.centos.pool.ntp.org iburst
Start ntp service to add the new time servers $ sudo systemctl start ntpd and enable ntp service $sudo systemctl enable ntpd , this will start the ntp service at boot.
Install RPM Puppet Server
In order to enable the Puppet official labs collection repository, run the following command
$ sudo rpm -ivh https://yum.puppetlabs.com/puppetlabs-release-pc1-el-7.noarch.rpmNow we should be able to see under "/etc/yum.repos.d/" puppetlabs-pc1.repo file and this is the repo where we will be able to install puppet master and puppet agent
$ less /etc/yum.repos.d/puppetlabs-pc1.repo

[puppetlabs-pc1]
name=Puppet Labs PC1 Repository el 7 - $basearch
baseurl=http://yum.puppetlabs.com/el/7/PC1/$basearch
gpgkey=file:///etc/pki/rpm-gpg/RPM-GPG-KEY-puppetlabs-PC1
enabled=1
gpgcheck=1

[puppetlabs-pc1-source]
name=Puppet Labs PC1 Repository el 7 - Source
baseurl=http://yum.puppetlabs.com/el/7/PC1/SRPMS
gpgkey=file:///etc/pki/rpm-gpg/RPM-GPG-KEY-puppetlabs-PC1
failovermethod=priority
enabled=0
gpgcheck=1
Install puppet master RPM package
$ sudo yum -y install puppetserverStart puppetserver service $ sudo systemctl start puppetserver and enable ntp service $sudo systemctl enable puppetserver , this will start the puppetserver service at boot.
Last configuration on the puppet master server is to add the puppet agent host IPs and hostnames in the /etc/hosts file since there is not a DNS setup. The file should look like this.
$ sudo vi /etc/hosts

127.0.0.1   puppet localhost localhost.localdomain localhost4 localhost4.localdomain4
::1         localhost localhost.localdomain localhost6 localhost6.localdomain6

192.168.50.201  jenkins-server
192.168.50.202  build-server
192.168.50.203  postgresql-server
192.168.50.204  redis-server
Install and Configure Puppet Agent
Install on all puppet agents, the puppet-agent RPM package and start the agent. So we will ssh via vagrant.
$ vagrant ssh jenkins_serverInstall the puppet labs repo as in the same way we did for the puppet master server
$ sudo rpm -ivh https://yum.puppetlabs.com/puppetlabs-release-pc1-el-7.noarch.rpmInstall puppet-agent
$ sudo yum -y install puppet-agentBefore we start the puppet-agent, modify the /etc/hosts by adding the puppet master server IP and hostname
$ sudo vi /etc/hosts

127.0.0.1   jenkins-server localhost localhost.localdomain localhost4 localhost4.localdomain4
::1         localhost localhost.localdomain localhost6 localhost6.localdomain6

192.168.50.200  puppet
Start the puppet agent
$ sudo su
$ /opt/puppetlabs/puppet resource service puppet ensure=running enable=true

# Should have an output
Notice: /Service[puppet]/ensure: ensure changed 'stopped' to 'running'
service { 'puppet':
    ensure => 'running',
    enable => 'true',
}

# The second puppet occurrence refers to your puppet server hostname
# If you have a different hostname, you need to change this here accordingly
# As note, after you run this command, the agent will actually generate a SSL certificate and send a signing request to the puppet master (which act as CA)
# Once the SSL is signed on the puppet master, then puppet master will be now be able to control and communicate to the agent
SSH to the rest of the hosts and repeat the same steps to install and configure puppet agent
- vagrant ssh buildserver (repeat the steps as we did above for jenkinsserver)
- vagrant ssh postgresserver (repeat the steps as we did above for jenkinsserver)
- vagrant ssh redisserver (repeat the steps as we did above for jenkinsserver)
Sign the signing request from the agents on the puppet master
List all unsigned certificate requests
sudo su
puppet cert list

"build-server"      (SHA256) 48:58:1C:2D:DC:A5:A8:08:43:B5:69:4B:72:A4:51 ........................
"jenkins-server"    (SHA256) 62:79:07:5D:65:81:DD:36:42:3B:C8:56:FC:EB:F1 ........................
"postgresql-server" (SHA256) 5C:FA:1D:3C:E0:C1:96:B3:14:BE:5F:38:E4:44:C4 ........................
"redis-server"      (SHA256) F2:A9:6E:0A:27:3F:81:23:A0:74:58:E6:C6:EA:60 ........................
Now signed the certificates
puppet cert sign --all

Notice: Signed certificate request for build-server
Notice: Removing file Puppet::SSL::CertificateRequest build-server at '/etc/puppetlabs/puppet/ssl/ca/requests/build-server.pem'
Notice: Signed certificate request for jenkins-server
Notice: Removing file Puppet::SSL::CertificateRequest jenkins-server at '/etc/puppetlabs/puppet/ssl/ca/requests/jenkins-server.pem'
Notice: Signed certificate request for redis-server
Notice: Removing file Puppet::SSL::CertificateRequest redis-server at '/etc/puppetlabs/puppet/ssl/ca/requests/redis-server.pem'
Notice: Signed certificate request for postgresql-server
Notice: Removing file Puppet::SSL::CertificateRequest postgresql-server at '/etc/puppetlabs/puppet/ssl/ca/requests/postgresql-server.pem'
Now you shouldn't be on any of the VMs to continue with the following below. In my case, I am on my MacOX computer.
Let's write some manifest files, puppet uses a DSL (Domain Specific Language) to describe the configuration of the system and it uses the manifest to save those descriptions written in the DSL.
Create the following directories under the root project "puppet-example"
$ cd path to puppet-example

$ mkdir -p code/environments/
$ mkdir -p code/environments/production/manifests/  # prod env
$ mkdir -p code/environments/test/manifests/        # test env
$ mkdir -p code/environments/stage/manifests/       # stage env
Create a file called site.pp (puppet manifest has extension .pp)
$ vim code/environments/production/manifests/site.ppAs for a quick test, we will tell puppet to install vim, wget, net-tools RPM packages, add the following to the site.pp file
package { 'vim':
        ensure  => installed,
}

package { 'wget':
        ensure => installed,
}

package { 'net-tools':
        ensure => installed,
}
package is a puppet resource which will install a given package name, at this level puppet makes an abstraction of the OS type, puppet uses a function called facter which returns the facts on the machine such as the OS type, therefore behind the scene puppet know which command to use to install the package.
ensure can have "installed" which instructs puppet to install the package or "absent" which instructs puppet to remove the package.
So the changes made now in the code directory should be in sync with the directory on the remote puppet master server since we've synced the two folders in the Vagrantfile on line 14
SSH to one of the puppet agent to do a test
$ vagrant ssh jenkins_serverTry the puppet facter to get some info on the machine (which puppet uses)
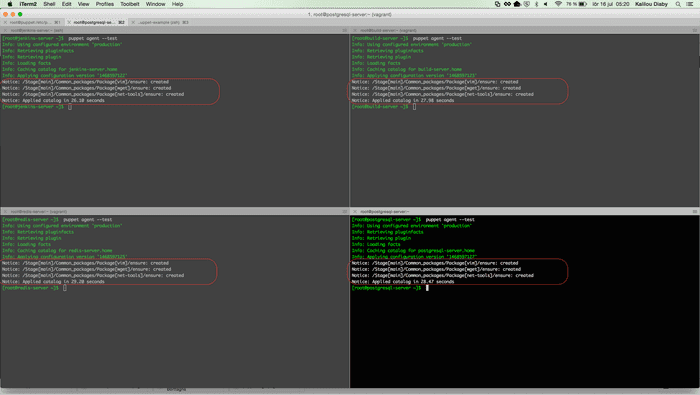
$ sudo /opt/puppetlabs/bin/facterNow let's run puppet agent to install the vim, wget, net-tools defined the manifest site.pp. Run # /opt/puppetlabs/bin/puppet agent --test on all the puppet agent machines as root. As tips, run this following to avoid using /opt/puppetlabs/bin/puppet all the same: $ sudo ln -s /opt/puppetlabs/bin/puppet /usr/bin/puppet after this is done, you can now just use $ puppet .... instead of $ /opt/puppetlabs/bin/puppet ....
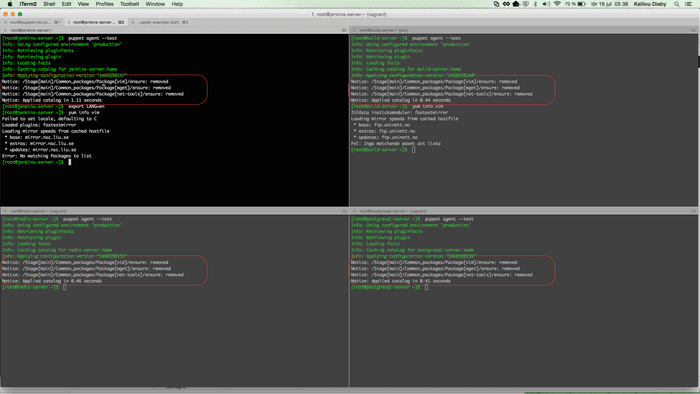
After you've ran the puppet agent on all machines then you should see the output below:
Now modify the code in the site.pp to remove those packages by changing ensure => installed to ensure => absent
package { 'vim':
    ensure  => absent,
}

package { 'wget':
    ensure => absent,
}

package { 'net-tools':
    ensure => absent,
}
Now run again puppet agent on all puppet agent machines
We will structure our manifest files now, create a file common.pp in which will contains all configurations to all machines $ vim code/environments/production/manifests/common.pp and should the contains the code below.
class common_packages {

   #Install the vim package
   package { 'vim':
       ensure  => installed,
   }

   # Install the wget package
   package { 'wget':
       ensure => installed,
   }

   # Install the net-tools package
   package { 'net-tools':
       ensure => installed,
   }
}
Modify the site.pp file $ vim code/environments/production/manifests/site.pp with the code below.
node 'jenkins-server' {

    # install the common packages
    include common_packages
}

node 'build-server' {

    # install the common packages
    include common_packages
}

node 'postgresql-server' {

    # install the common packages
    include common_packages
}

node 'redis-server' {

    # install the common packages
    include common_packages
}
This catalog will be compiled and send to the puppet agent machine # For example when we run $ puppet agent --test on the jenkins-server # only the code block under node jenkins-server will be executed.
Puppet also offers modules which are self contained bundle of code and data. They can be found on the puppet forge https://forge.puppet.com/, in my case I will be installing jenkins and since the module of jenkins is already on puppet forge I will just download that and run it, I don't have to re-invent the wheel. More on puppet modules, please visit Puppet Modules.
Download puppet module jenkins on the puppet master server
$ vagrant ssh puppet_masterrun
$ sudo puppet module install rtyler-jenkinsNow let's go our development laptop (in my case my MacOX) and create another file called jenkins_prod.pp:
$ vim code/environments/production/manifests/jenkins_prod.pp` class jenkins_install {
# Include the jenkins module we just installed on the puppet master server
include jenkins
# Install some plugins
jenkins::plugin {
'git': version => 'lastest'
}
jenkins::plugin {
'maven-plugin': version => 'lastest'
}
jenkins::plugin {
'git-client': version => 'lastest'
}
jenkins::plugin {
'git-server': version => 'lastest'
}
jenkins::plugin {
'ssh-slaves': version => 'lastest'
}
jenkins::plugin {
'javadoc': version => 'lastest'
}
jenkins::plugin {
'mailer': version => 'lastest'
}
jenkins::plugin {
'swarm': version => 'lastest'
}
jenkins::plugin {
'junit': version => 'lastest'
}
jenkins::plugin {
'ghprb': version => 'lastest'
}
jenkins::plugin {
'ldap': version => 'lastest'
}
jenkins::plugin {
'cvs': version => 'lastest'
}
jenkins::plugin {
'ssh-credentials': version => 'lastest'
}
jenkins::plugin {
'dashboard-view': version => 'lastest'
}
jenkins::plugin {
'durable-task': version => 'lastest'
}
jenkins::plugin {
'external-monitor-job': version => 'lastest'
}
jenkins::plugin {
'plain-credentials': version => 'lastest'
}
jenkins::plugin {
'publish-over-ssh': version => 'lastest'
}
}Now modify again the site.pp file $ vim code/environments/production/manifests/site.pp by including the jenkinsinstall class (include jenkinsinstall) under node 'jenkins-server'
node 'jenkins-server' {

    # install the common packages
    include common_packages

    # Install Jenkins server and some plugin
    include jenkins_install
}

node 'build-server' {

    # install the common packages
    include common_packages
}

node 'postgresql-server' {

    # install the common packages
    include common_packages
}

node 'redis-server' {

    # install the common packages
    include common_packages
}

# This catalog will be compiled and send to the puppet agent machine
# For example when we run puppet agent --test on the jenkins-server
# only the code block under node 'jenkins-server' will be executed.
SSH to jenkins-server machine
$ vagrant ssh jenkins-serverrun as root
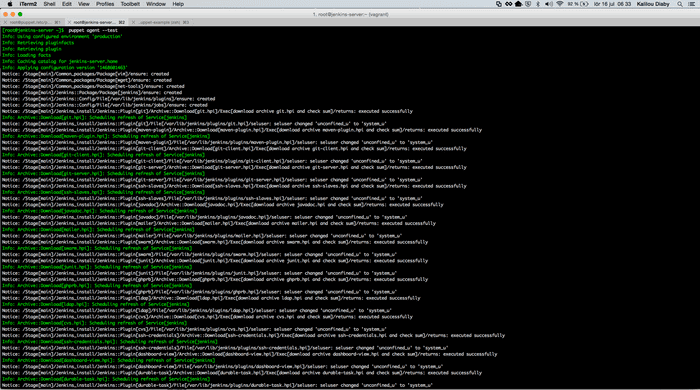
puppet agent --testOutput
Check that jenkins server is running # ps aux | grep jenkins
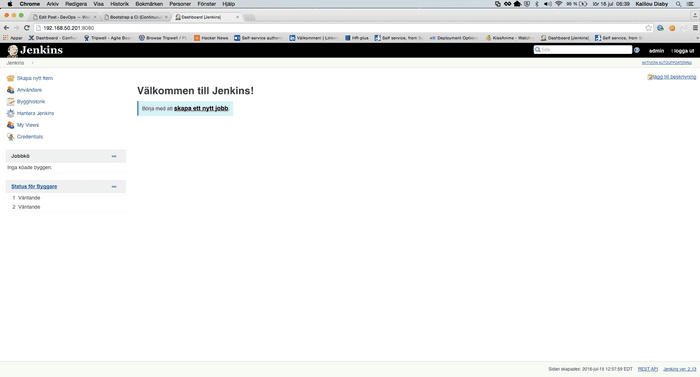
Now go to http://192.168.50.201:8080
Redis-Server
For installing Redis, we will use two options, the first one is to install Redis from a puppet module already written by a community member and second option is to install Redis using the puppet DSL (Good for someone new to puppet in order to understand the puppet DSL)
Install Redis from a module
SSH to the puppet master server and run the following command to install the module: # puppet module install fsalum-redis
Now on your workstation, create a file redis-prod.pp # vim code/environments/production/manifests/redis_prod.pp and should contains the following code below.
class redis_install {

    class { 'redis':
        conf_port           => '6379',   # Port number
        conf_bind           => '0.0.0.0' # Network Interface
        service_enable      => true      # Enable Redis at boot
        service_ensure      => 'running' # Make sure after installation, redis is running
    }
}
Include redis_install class to the site.pp file $ vim code/environments/production/manifests/site.pp under the node 'redis-server'
node 'jenkins-server' {

    # install the common packages
    include common_packages

    # Install Jenkins server and some plugin
    include jenkins_install
}

node 'build-server' {

    # install the common packages
    include common_packages
}

node 'postgresql-server' {

    # install the common packages
    include common_packages
}

node 'redis-server' {

    # install the common packages
    include common_packages

    # Install and configure redis server
    include redis_install
}

# This catalog will be compiled and send to the puppet agent machine
# For example when we run puppet agent --test on the jenkins-server
# only the code block under node 'jenkins-server' will be executed.
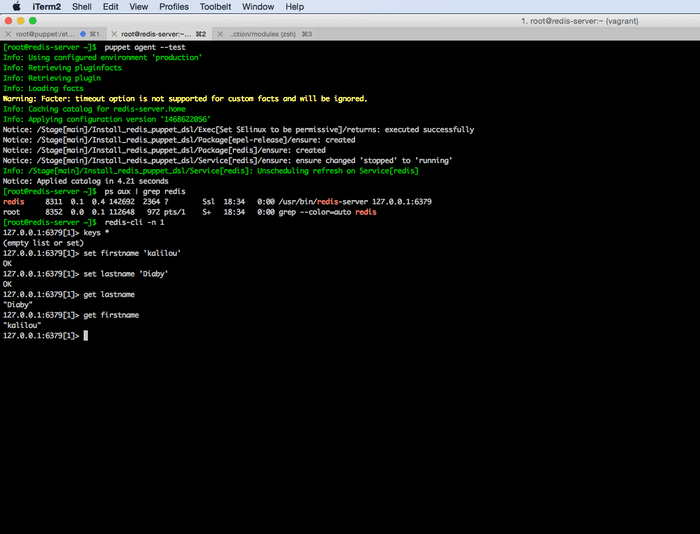
On redis-server, SSH on and run # puppet agent --test and after that check that the process is running # ps aux | grep redis
Install Redis using Puppet DSL
Now on your workstation, modify a file redisprod.pp $ vim code/environments/production/manifests/redisprod.pp by adding a new class redisinstallpuppet_dsl
class install_redis_puppet_dsl {

    exec { 'Set SElinux to be permissive':
        command    => 'sudo setenforce 0',
        path       => ['/sbin', '/usr/sbin'],
        user       => 'root'
    }

    package { 'redis':
        ensure  => installed,
        require => Package['epel-release']
    }

    service { 'redis':
        ensure => 'running'
        enable => true

    }
}
Modify the site.pp file by commenting out the at line 28 "include redisinstall" and add include installredispuppetdsl and the site.pp should look like the following.
node 'jenkins-server' {

    # install the common packages
    include common_packages

    # Install Jenkins server and some plugin
    include jenkins_install
}

node 'build-server' {

    # install the common packages
    include common_packages
}

node 'postgresql-server' {

    # install the common packages
    include common_packages
}

node 'redis-server' {

    # install the common packages
    include common_packages

    # Install and configure redis server
    # include redis_install

    # Install and configure puppet using only puppet resources
    include install_redis_puppet_dsl
}

# This catalog will be compiled and send to the puppet agent machine
# For example when we run puppet agent --test on the jenkins-server
# only the code block under node 'jenkins-server' will be executed.
On redis-server, SSH on and run # puppet agent --test and after that check that the process is running # ps aux | grep redis and you should be able to connect to redis server and run some commands.
Install PostgreSQL 9.5
Now, let's not use any module for installing postgres for the purpose of this tutorial which is to understand puppet. But module are nice once you get a better understanding of puppet. Create a file on your workstation $ vim code/environments/production/manifests/postgres_prod.pp which the following code.
class install_postgres {

    # Remove the repo if it is already install
    package { 'pgdg-centos95-9.5-2.noarch':
        ensure  => absent
    }

    # Install postgresql repository package, this is the same as the one above
    exec { 'Install postgresql repository package':
        command    => 'yum install -y http://yum.postgresql.org/9.5/redhat/rhel-7-x86_64/pgdg-centos95-9.5-2.noarch.rpm',
        path       => ['/bin', '/usr/bin'],
        user       => 'root'
    }

    # Install some required PostgreSQL RPM Packages
    package { 'postgresql95.x86_64':
        ensure => installed,
    }

    package { 'postgresql95-devel.x86_64':
        ensure => installed,
    }

    package { 'postgresql95-server.x86_64':
        ensure => installed,
    }

    # Initialize the postgresql db cluster
    # This is only ran once,
    # so we have to check if the file postgresql.conf exist
    exec { 'Initialize the postgresql db cluster':
        command    => '/usr/pgsql-9.5/bin/postgresql95-setup initdb',
        onlyif     => "test ! -f /var/lib/pgsql/9.5/data/postgresql.conf",
        path       => ['/bin', '/usr/bin'],
        user       => "root",
        group      => "root",
        logoutput  => on_failure
    }

    # Restart PostgreSQL server
    service { 'postgresql-9.5':
        ensure => 'running',
        enable => true
    }
}
Now modify the site.pp to add install_postgres to node 'postgresql-server':
$ vim code/environments/production/manifests/redis_prod.pp`node 'jenkins-server' {
# install the common packages
include common_packages
# Install Jenkins server and some plugin
include jenkins_install
}
node 'build-server' {
# install the common packages
include common_packages
}
node 'postgresql-server' {
# install the common packages
include common_packages
# Install and configure postgresql
include install_postgres
}
node 'redis-server' {
# install the common packages
include common_packages
# Install and configure redis server
# include redis_install
# Install and configure puppet using only puppet resources
include install_redis_puppet_dsl
}
# This catalog will be compiled and send to the puppet agent machine
# For example when we run puppet agent --test on the jenkins-server
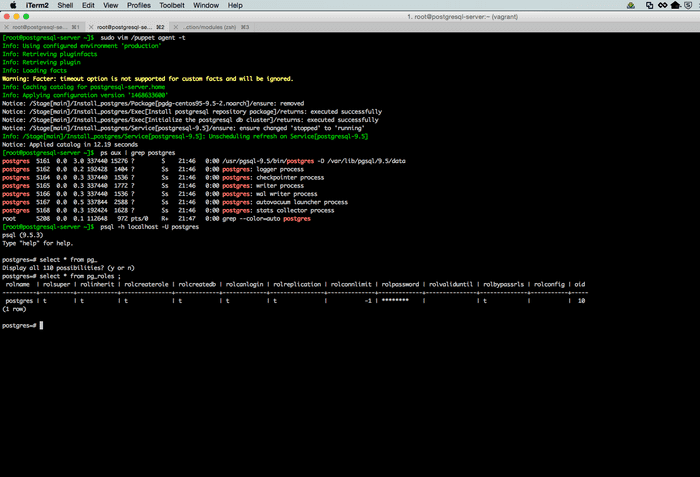
# only the code block under node 'jenkins-server' will be executed.SSH to postgres server $ vagrant ssh postgres_server and run # puppet agent --test. You should see the following output indicating postgresql has been installed and up and running
Prepare the build server
As for the build server, you can install anything you want such as RPM package rpm-build, redhat-rpm-config and so on. All you need is to follow the same structure, create a manifest file build.pp under manifest directory and later add it to site.pp under node build-server, then SSH to the build-server and run puppet agent --test? and Bingo!
Hope you've enjoyed this tutorial on puppet.


