Tuesday July 12th, 2016
AWS VPC with Terraform
In this tutorial, we will be creating a basic AWS VPC resources including the following:
- VPC
- Subnets (one private and two private)
- Routes
- Route Tables
- Elastic (EIP)
- Nat Gateway
- Route Association Table
GitHub source code: https://github.com/kalilou/TerraformtutorialVPC
Before we dive in, let's explain the two concepts, what is Terraform and what is a VPC in AWS
Terraform
In order to understand terraform, let's take look at some of the Server Configuration Management such as Ansible, Chef, Puppet and Saltstack which are used to provision a single server maybe Virtual, Physical, Docker container or LXC container. But maybe you would like to have something higher than that, maybe something like provision your compute resources, storage resources and network resources. In a nutshell, you would like to describe your entire infrastructure topology in a more shareable way (having your infrastructure as code). And terraform uses a configuration language called HCL inspired by Nginx configuration way. But if you like JSON which is a machine friendly language, you can also export HCL to JSON. For more info on Terraform, please visit the following link Terraform (HashiCorp)
AWS VPC
VPC stands for Virtual Private Cloud. With a AWS VPC you decide on how your network will look like and then you get to build it in the way that suits you well, for example, you get to choose the IP addresses you want, you can also decide on how to break down your VPC into subnets by having for instance non internet-facing subnets (Private subnets) and internet-facing subnets (Public subnets). We will take more about the VPC in the rest of this tutorial.
Let's get-started
AWS VPC stands for Virtual Private Cloud which basically provides a way to structure your own network the way you want in AWS. Before we dive in let's define some basic VPC concepts:
- CIDR - Classless Intern-Domain Routing, let's choose the address range which will represent our VPC (172.31.0.0/16) which in turn gives the following in the binary format 1010 1100.1111 0000.0000 0000.0000 0000 the slash 16 (/16) indicates the first 16 bits will be fixed and represents the network and the rest 16 bits will represent the hosts. I will recommend to use the /16 which will have 64 000 IP addresses which is nice for some use cases.
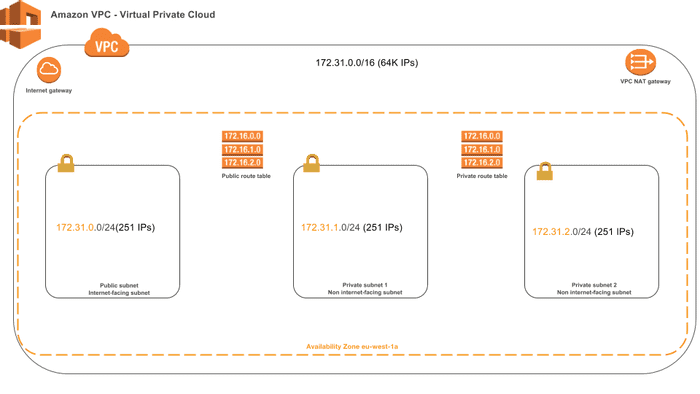
- Subnets: In this tutorial we will setup three subnets, one public ( 172.31.0.0/24 ) and two privates (172.31.1.0/24 and 172.31.2.0/24 ), what this means is that the public subnet can be accessible from the internet and the private subnets cannot be accessible from the internet. Each subnet will have 251 IP addresses.
- Internet Gateway: An Internet Gateway is a VPC component that allows communication between your VPC and the internet.
- Nat Gateway: Network Address Translation Gateway is used to allow the instances in the private subnets to connect to the internet but the other way around is not possible for example it will prevent the internet from initiating a connection with the instances in the private subnets.
- Route Table: The route table basically contains rules regarding where the packets should go, in our case we will have two route tables, one for the public subnet in which all connections to the internet will go through the Internet Gateway and as for the private subnets all connections to the internet will go through the NAT Gateway.
- Elastic EIP: An EIP will be asssociated with the NAT Gateway, so basically an elastic IP is a static IP associated with your AWS account, for example you can use an EIP for an instance with private IP so that the instance will be reachable from the internet.
- Route Association Table: This means you can associate your subnets to the route tables you've defined, therefore the rules defined in that route table will be applied to the subnets.
The figure below represent our VPC topology
Let's now install Terraform
Go to the following URL https://www.terraform.io/downloads.html to download Terraform according you OS, in this tutorial I am using MacOX.
After a successful installing you should be able to run and see the following output
$ terraform
usage: terraform [--version] [--help] <command> [<args>]

Available commands are:
    apply       Builds or changes infrastructure
    destroy     Destroy Terraform-managed infrastructure
    get         Download and install modules for the configuration
    graph       Create a visual graph of Terraform resources
    init        Initializes Terraform configuration from a module
    output      Read an output from a state file
    plan        Generate and show an execution plan
    push        Upload this Terraform module to Atlas to run
    refresh     Update local state file against real resources
    remote      Configure remote state storage
    show        Inspect Terraform state or plan
    taint       Manually mark a resource for recreation
    validate    Validates the Terraform files
    version     Prints the Terraform version
Now, we will be creating some AWS resources via Terraform
Configure the AWS provider
provider "aws" {
  region = "${var.aws_region}"
  access_key = "${var.access_key}"
  secret_key = "${var.secret_key}"
}- provider: Represents in Terraform HCL language the cloud provider which can be AWS (Amazon Web Services), GCP (Google Cloud Platform), Azure and so on. Check out the list of all supported providers https://www.terraform.io/docs/providers/index.html
- region: Represents the aws geographical location where your resources will be created and in my case the location is Ireland in Europe. And more on AWS region, checkout this out http://aws.amazon.com/about-aws/global-infrastructure/
- access_key: Your AWS user account access_key, will be used by Terraform to perform some task on your AWS account on your behalf
- secret_key: Your AWS user account secret_key, will be used by Terraform to perform some task on your AWS account on your behalf
The accesskey and secretkey are your AWS static credentials can be found under AWS Identy and Access Management in your AWS console. In case, your code will be versioned in GIT or BitBucket or Stash, I will recommend to use the environment variables AWS_ACCESS_KEY_ID, AWS_SECRET_ACCESS_KEY and AWS_DEFAULT_REGION. Now let's reconfigure the aws provider one more time with the environment variables.
provider "aws" {}And now we will export the environment variables (you may also wanna put them in your .bash_profile)
$ export AWS_ACCESS_KEY_ID="anaccesskey"
$ export AWS_SECRET_ACCESS_KEY="asecretkey"
$ export AWS_DEFAULT_REGION="us-west-2"
Create VPC
resource "aws_vpc" "vpc_tuto" {
  cidr_block = "172.31.0.0/16"
  enable_dns_support = true
  enable_dns_hostnames = true
  tags = {
    Name = "TestVPC"
  }
}- resources: is a Terraform HCL notation for creating resources
- aws_vpc: Terraform notation representing AWS VPC resource
- vpc_tuto: is a name given to the VPC which can be used later to get thing like vpcid or mainroutetableid
- cidr_block: Address range for the VPC
- enablednssupport: If set to true will enable DNS support to the VPC, so this will indicate that the DNS resolution will be supported for the VPC
- enablednshostname: Indicates whether the instances launched in the VPC get DNS hostnames.
- tags: Tags are helpful, when you want to categorize your resources.
Create VPC public subnet
resource "aws_subnet" "public_subnet_eu_west_1a" {
  vpc_id                  = "${aws_vpc.vpc_tuto.id}"
  cidr_block              = "172.31.1.0/24"
  map_public_ip_on_launch = true
  availability_zone = "eu-west-1a"
  tags = {
    Name =  "Subnet az 1a"
  }
}- aws_subnet: Terraform notation representing AWS VPC subnet resource
- publicsubneteuwest1a: Name given the subnet
- mappubliciponlaunch: Means that any instance created in this subnet will have a public IP
- vpc_id: VPC ID, is actually the VPC we've created above
- availability_zone: As mentioned, the resources will be created in the Ireland region and within the region you have multiple availability zone which represents a physical isolated datacenter.
Create VPC private subnets
resource "aws_subnet" "private_1_subnet_eu_west_1a" {
  vpc_id                  = "${aws_vpc.vpc_tuto.id}"
  cidr_block              = "172.31.2.0/24"
  availability_zone = "eu-west-1a"
  tags = {
    Name =  "Subnet private 1 az 1a"
  }
}

resource "aws_subnet" "private_2_subnet_eu_west_1a" {
  vpc_id                  = "${aws_vpc.vpc_tuto.id}"
  cidr_block              = "172.31.3.0/24"
  availability_zone = "eu-west-1a"
  tags = {
    Name =  "Subnet private 2 az 1a"
  }
}
Create Internet Gateway
resource "aws_internet_gateway" "gw" {
  vpc_id = "${aws_vpc.vpc_tuto.id}"
  tags {
        Name = "InternetGateway"
    }
}awsinternetgateway: Terraform notation for creating an Internet Gateway resource in AWS
Create route to the internet
resource "aws_route" "internet_access" {
  route_table_id         = "${aws_vpc.vpc_tuto.main_route_table_id}"
  destination_cidr_block = "0.0.0.0/0"
  gateway_id             = "${aws_internet_gateway.gw.id}"
}- aws_route: Terraform notation for creating an Route resource in AWS
- internet_access: Name given to the route
- routetableid: Route table ID which contains rules indicating how the packets should be routed, we will assign the main vpc route table ID, in AWS when you created a VPC, you will have a main route table by default
- destinationcidrblock: The destination which obviously here is the internet
- gateway_id: Gateway ID, where all the packets to the internet should be routed through, if you remember the Internet Gateway allow you VPC to communicate with the Internet.
Create Elastic IP (EIP)
We will create this IP to assign it the NAT Gateway
resource "aws_eip" "tuto_eip" {
  vpc      = true
  depends_on = ["aws_internet_gateway.gw"]
}- aws_eip: Terraform notation for creating an EIP resource in AWS
- vpc: If true, the EIP is in the VPC
- depend_on: Conditional variable which say in this case the EIP resource should be created after the Internet Gateway is already created
Create NAT Gateway
Make sure to create the nat in a internet-facing subnet (public subnet)
resource "aws_nat_gateway" "nat" {
    allocation_id = "${aws_eip.tuto_eip.id}"
    subnet_id = "${aws_subnet.prublic_subnet_eu_west_1a.id}"
    depends_on = ["aws_internet_gateway.gw"]
}- awsnatgateway: Terraform notation for creating an NAT Gateway resource in AWS
- nat: Name given to the NAT resource
- allocation_id: The NAT should have an elastic IP address (static IP)
- subnet_id: Subnet ID in which the NAT resource will be created
Create private route table and the route to the internet
This will allow all traffics from the private subnets to the internet through the NAT Gateway (Network Address Translation)
resource "aws_route_table" "private_route_table" {
    vpc_id = "${aws_vpc.vpc_tuto.id}"

    tags {
        Name = "Private route table"
    }
}

resource "aws_route" "private_route" {
  route_table_id  = "${aws_route_table.private_route_table.id}"
  destination_cidr_block = "0.0.0.0/0"
  nat_gateway_id = "${aws_nat_gateway.nat.id}"
}
Create Route Table Associations
we will now associate our subnets to the different route tables
# Associate subnet public_subnet_eu_west_1a to public route table
resource "aws_route_table_association" "public_subnet_eu_west_1a_association" {
    subnet_id = "${aws_subnet.public_subnet_eu_west_1a.id}"
    route_table_id = "${aws_vpc.vpc_tuto.main_route_table_id}"
}

# Associate subnet private_1_subnet_eu_west_1a to private route table
resource "aws_route_table_association" "pr_1_subnet_eu_west_1a_association" {
    subnet_id = "${aws_subnet.private_1_subnet_eu_west_1a.id}"
    route_table_id = "${aws_route_table.private_route_table.id}"
}

# Associate subnet private_2_subnet_eu_west_1a to private route table
resource "aws_route_table_association" "pr_2_subnet_eu_west_1a_association" {
    subnet_id = "${aws_subnet.private_2_subnet_eu_west_1a.id}"
    route_table_id = "${aws_route_table.private_route_table.id}"
}
Now let's run Terraform to provide those resources in AWS
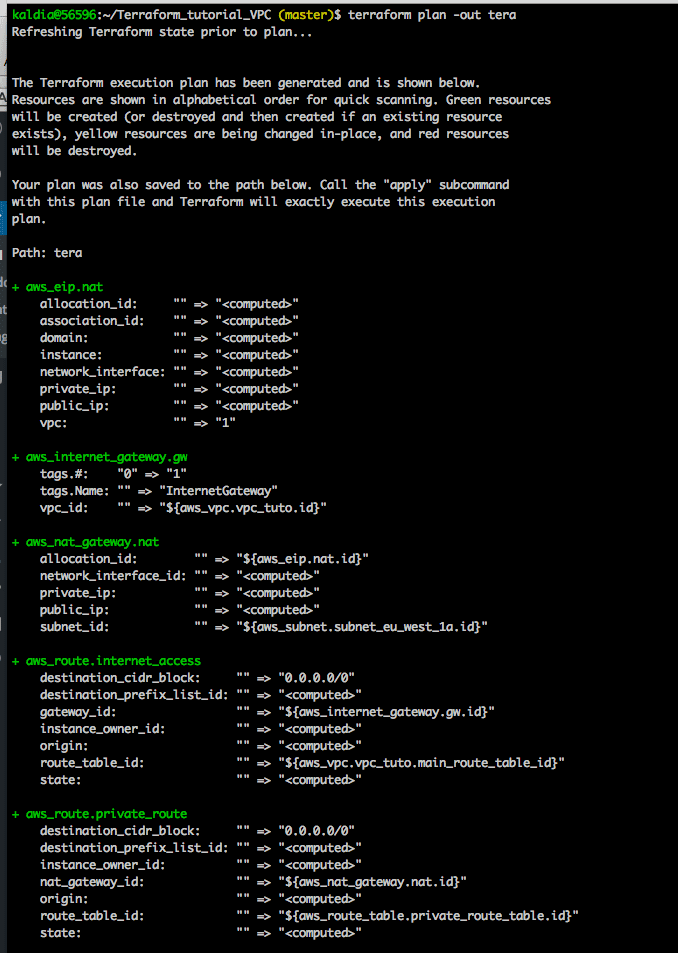
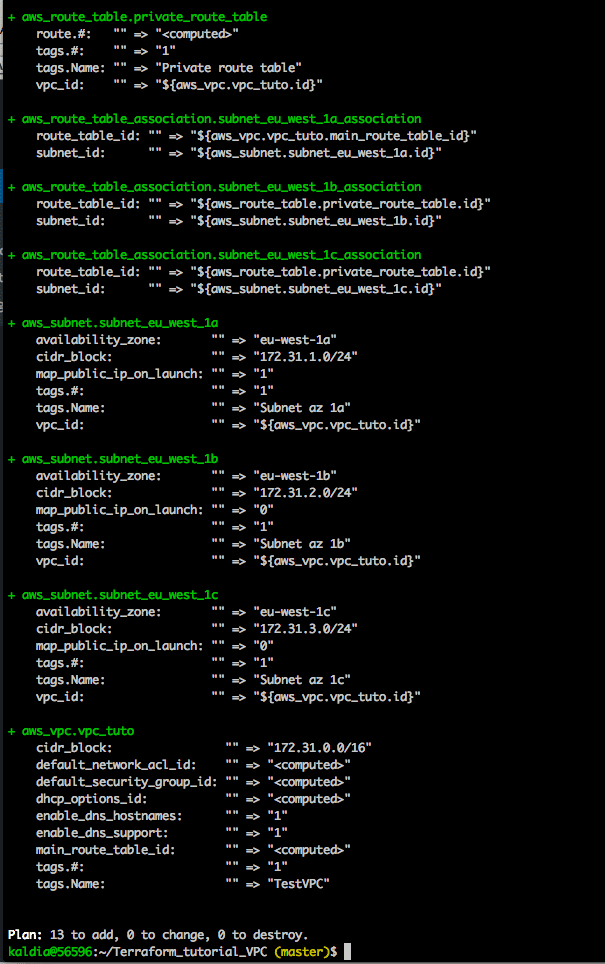
Let's run the following command to see how terraform plans to create the resources $ terraform plan -out tera
This will show the output of collection of resources which will be created
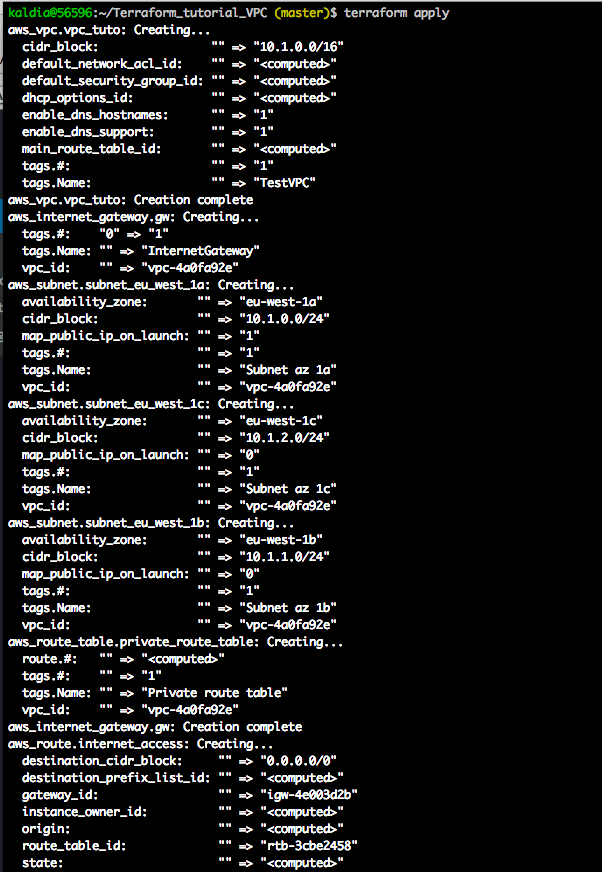
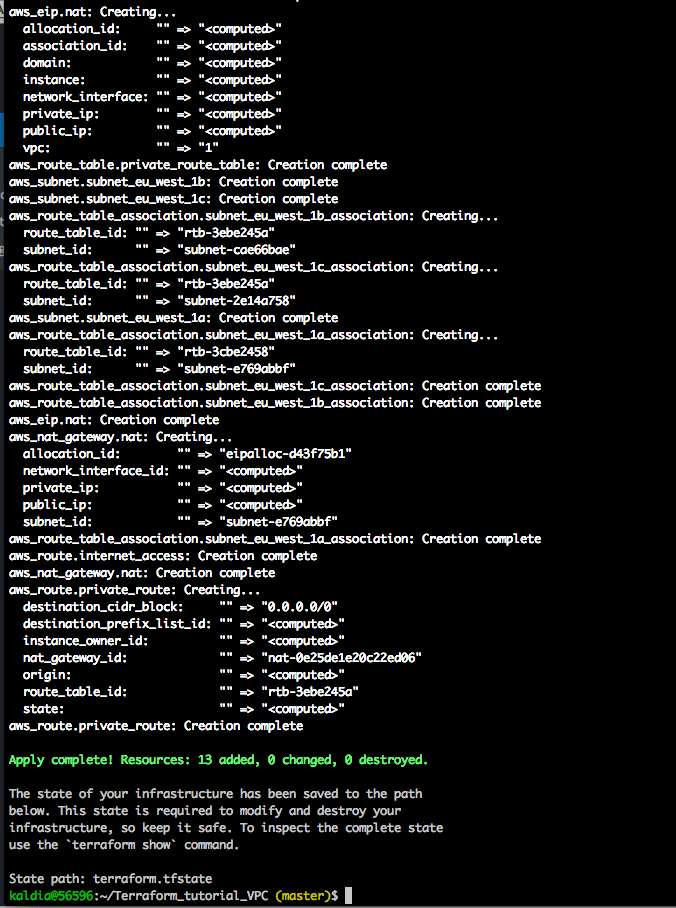
Now let's run the following command to create the resource $ terraform apply
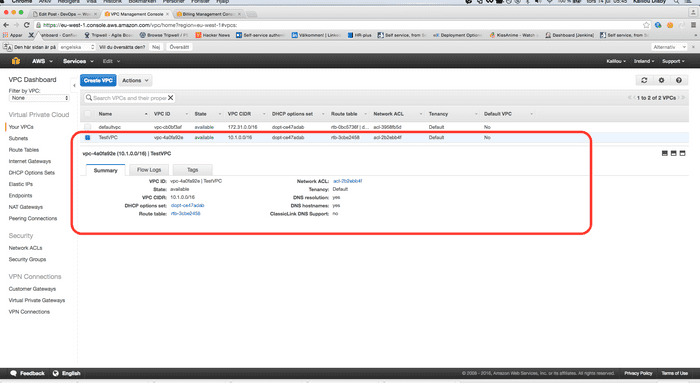
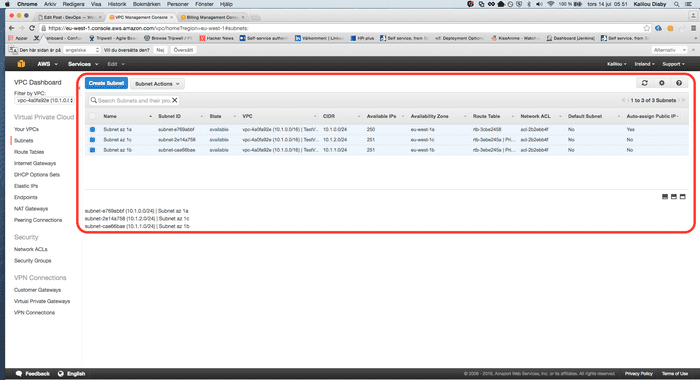
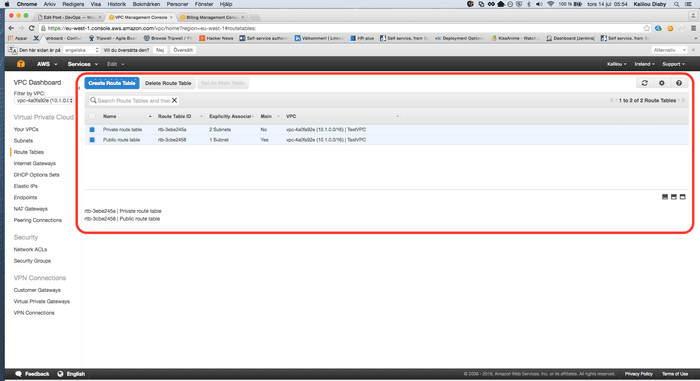
Now in your AWS console you should see the resources created
VPC created
Subnets created
Route Tables created
You should be all resources created, now let's play with terraform command lines
In order to visualize the representation of the execution plan, run the following command $ terraform graph | dot -Tpng > graph.png which will generate a png file as follow:
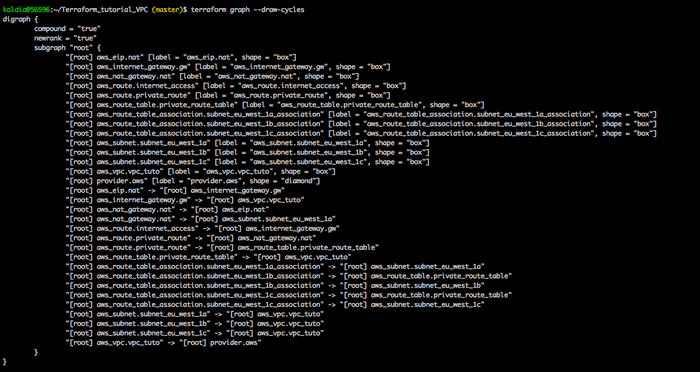
You can also run as simple as simple $ terraform graph and you will get the following below:
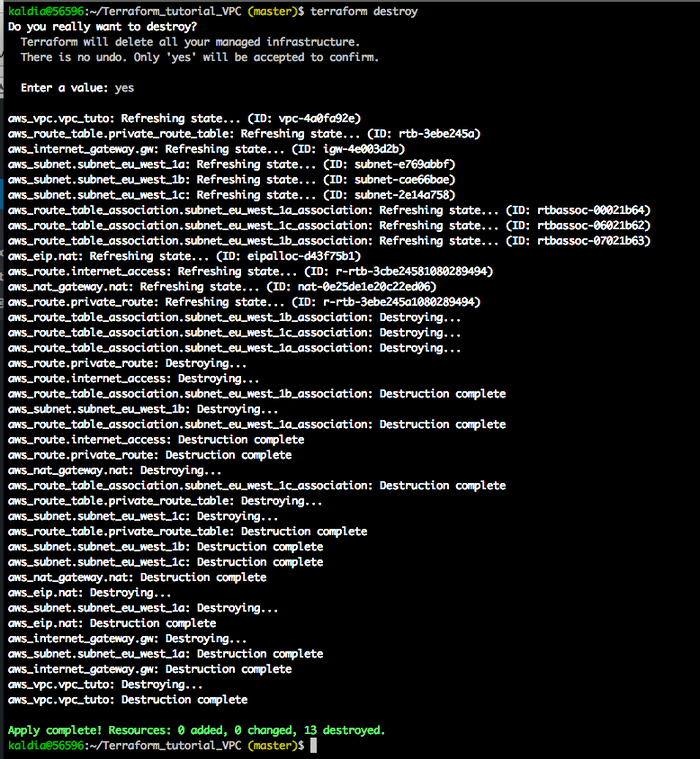
Don't forget to destroy the resources if they are not needed, in my case since this is the end of the tutorial, I will use the following command to destroy the resources, otherwise you may get some bills from AWS. $ terraform destroy
Thanks you for reading and hope this will be helpful.


