Monday July 11th, 2016
Bootstrap a CI with Ansible
In this tutorial, we will setup a continuous integration via spinning up a jenkins server and simple build server as jenkins slave. The goal of this, is the implement all this using Ansible, Vagrant, and VirtualBox. The goal of this tutorial, is to spin up a simple build server and a Jenkins server with some useful plugins installed, for example the swarm plugin installed which will allow the build server to register itself as a node in the Jenkins server. So basically every time you spin up a new build server with the swarm client installed on it, it will automatically register itself as a node to the Jenkins server.
Source code on Github: Kalilou ansible example github
Before we dive in, let's understand some of the basic concepts in Ansible, Vagrant and VirtualBox.
Ansible is written in python which makes it really easy and simple and it provides the following use cases: provisioning, configuration management, Application Deployment, Continuous Delivery, Security & Compliance and IT Orchestration. For more information, please take a look at the in-depth documentation Ansible doc.
In our case, we will use Ansible for provisioning and server configuration management. Ansible has three essential principals as follow:
-
Simple (A quick productivity)
- Human readable automation
- You don't any special coding skill to get-started with Ansible
- The Ansible tasks are executed in order
- Agentless (More efficient and more secure)
- No client or agent on the host machines are needed, so no extra code to manage
- Ansible uses only OpenSSH(Linux) and WinRM(Window) to execute the tasks remotely on the host machine
- Powerful (Cover many use cases)
- App Deployment
- Provisioning
- Server Configuration Management
- IT Orchestration
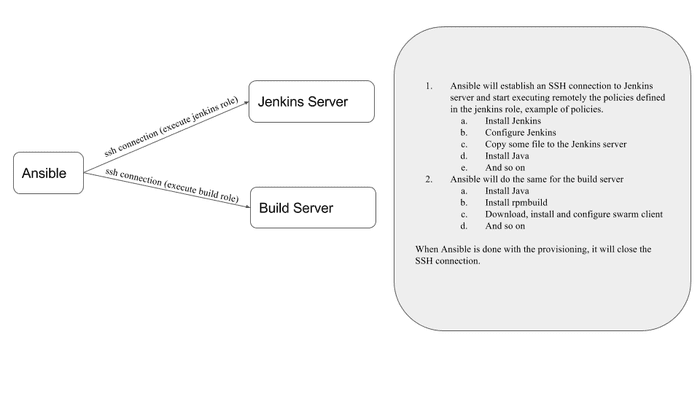
Let's look at the picture below to see how Ansible works in a nutshell.
Terminology
- Inventory file: In INI format, it describes the hosts and groups in ansible. Ansible uses this file to manage the hosts defined in the inventory file. As for the group, for example you can have a postgreSQL group in which you define your postgreSQL db hosts, or you can also have Loadbalancer group in which you can define your HAproxy or Nginx hosts.
- Ad-hoc commands: The concept is that sometimes there are commands you wanna run and don’t wanna save them for later since it’s something you wanna type to do something quick. For let’s use the following ad-hoc command to ping all the hosts in the webservers group.
- Playbook: Playbook is automation scripts written in YAML(Markup Language) format which is really human readable, Ansible will use that file to either provision, app deployment, configuration management or IT Orchestration.
- Roles: Roles are used to organization playbook, for example in this tutorial, we will have the Jenkins role which only takes care of installing and configuring Jenkins and same for the build server. Another nice example of role can be you've defined a common task which needs to executed on all machines e.g installing vim, wget, net-tools and so on.
- Modules: Modules are built-in function in Ansible which does a single task for example copying files, downloading files, start/stop/restart/reload a service and so on.
Vagrant is a tool to used in our case to spin up a virtual development environment. Vagrant is created by Mitchell Hoshimoto and is written in Ruby
Virtualbox is a free, open source, cross-platform application for creating, managing and running virtual machines (VMs)
Install Ansible
You can install ansible via pip or Homebrew for MacOX users.
$ sudo pip install ansible paramiko PyYMAL Jinja2 httplib six

# You can also install ansible via Homebrew on MacOX
$ brew cask install ansible

# For Centos users
$ sudo yum install ansible

# For Ubuntu users
$ sudo apt-get install software-properties-common
$ sudo apt-add-repository ppa:ansible/ansible
$ sudo apt-get update
$ sudo apt-get install ansible
Install Vagrant
For MacOX users
$ brew cask install vagrant

# or you can install it using Mac pkg installer
$ wget https://releases.hashicorp.com/vagrant/1.8.1/vagrant_1.8.1.dmg
$ hdiutil attach vagrant_1.8.1.dmg
$ sudo installer -pkg /Volumes/VirtualBox/VirtualBox.pkg -target /Volumes/Macintosh\\ HD
For Centos7 users
$ wget https://releases.hashicorp.com/vagrant/1.8.1/vagrant_1.8.1_x86_64.rpm
$ yum localinstall vagrant_1.8.1_x86_64.rpm
For Ubuntu users
$ sudo apt-get update
$ sudo apt-get install vagrant
Install VirtualBox
For MacOX users
$ brew cask install virtualbox

# or use the pkg installer
$ wget http://download.virtualbox.org/virtualbox/5.0.14/VirtualBox-5.0.14-105127-OSX.dmg
$ hdiutil attach VirtualBox-5.0.14-105127-OSX.dmg
$ sudo installer -pkg /Volumes/VirtualBox/VirtualBox.pkg -target /Volumes/Macintosh\\ HD
For CentOS7 users
$ cd /etc/yum.repos.d/
$ wget http://download.virtualbox.org/virtualbox/rpm/fedora/virtualbox.repo
$ yum update -y
$ yum install binutils qt gcc make patch libgomp glibc-headers glibc-devel kernel-headers kernel-devel dkms
$ yum install virtualbox-5.0
For Ubuntu users
$ sudo apt-get update
$ sudo apt-get install virtualbox
$ sudo apt-get install virtualbox-dkms
Vagrantfile
In the Vagrantfile, we will defined two hosts which are a Jenkins and build server. Here is the Vagrantfile below
As you can notice on line 17 and 34, a provision option chosen is ansible.
# -*- mode: ruby -*-
# vi: set ft=ruby :

VAGRANTFILE_API_VERSION = "2"

Vagrant.configure(VAGRANTFILE_API_VERSION) do |config|

    config.vm.define :jenkins_server do |jenkins_server_config|
      jenkins_server_config.vm.box = "centos/7"
      jenkins_server_config.vm.hostname = "jenkins-server"
      jenkins_server_config.vm.network "private_network", ip: "192.168.50.200"
      jenkins_server_config.vm.synced_folder ".", "/home/vagrant/sync", disabled: true
      jenkins_server_config.ssh.forward_agent = true
      jenkins_server_config.ssh.insert_key = false
      jenkins_server_config.ssh.private_key_path = ["~/.vagrant.d/insecure_private_key" ]

      jenkins_server_config.vm.provision "ansible" do |ansible|
        ansible.playbook = "playbook.yml"
        ansible.inventory_path = "hosts"
        ansible.limit = "jenkins-server"
      end

    end

    config.vm.define :build_server do |build_server_config|
      build_server_config.vm.box = "centos/7"
      build_server_config.vm.hostname = "build-server"
      build_server_config.vm.network "private_network", ip: "192.168.50.201"
      build_server_config.vm.synced_folder ".", "/home/vagrant/sync", disabled: true
      build_server_config.ssh.forward_agent = true
      build_server_config.ssh.insert_key = false
      build_server_config.ssh.private_key_path = ["~/.vagrant.d/insecure_private_key" ]

      build_server_config.vm.provision "ansible" do |ansible|
        ansible.playbook = "playbook.yml"
        ansible.inventory_path = "hosts"
        ansible.limit = "build-server"
      end
    end
end
So this Vagrantfile will help us to spin up a Jenkins server and a build server and at the same time provisions them via ansible. For more documentation check out my post on Vagrant and Ansible.
The Inventory file
In this file we will define the hosts (machines), so Ansible is aware of the machines to be provision. basically Ansible uses this file to establish an ssh connection and start executing remotely the policies defined in the playbook.
[ci-integration]
jenkins-server ansible_host=192.168.50.200

[build]
build-server ansible_host=192.168.50.201
The ansible.cfg file
Ansible uses certain configuration such as remoteuser, hostfile, transport, ssh_args _and so on. So in this file, we will define those variables so ansible will use them.
[defaults]
remote_user = vagrant
hostfile = inventory
transport = ssh

[ssh_connection]
ssh_args = -o ForwardAgent=yes
Ansible roles
Roles are the best way to organize your playbooks, basically a role will contain a specific task to be executed for example a role can be called common where you install only the common packages to your all your servers e.g Java, python, vim, wget and so on. Let's take a look at the following role structure:
build server role
- name: Install Java jdk 1.8
  become: yes
  yum: name=java-1.8.0-openjdk state=present

- name: Install required rpm for the build
  become: yes
  yum: pkg={{ item }} state=present
  with_items:
    - rpm-build
    - redhat-rpm-config
    - ruby
    - swig
    - openssl-devel
    - ruby-devel
    - sqlite-devel
    - glib2

- name: Copy swarm client to remote location /opt/
  become: yes
  copy: src=files/swarm-client-2.0.tar.gz dest=/opt/swarm-client-2.0.tar.gz

- name: Copy swarm client script to remote location /etc/init.d/
  become: yes
  copy: src=files/swarm dest=/etc/init.d/swarm owner=root group=root mode=0755

- name: Unzip swarm-client-2.0.tar.gz
  become: yes
  shell: cd /opt/ && tar xzvf swarm-client-2.0.tar.gz
  args:
    executable: /bin/bash

- name: Start swarm client
  become: yes
  shell: /etc/init.d/swarm start
  args:
    executable: /bin/bash
Jenkins dependencies role
- name: Install Git
  become: yes
  yum: name=git state=present

- name: Install Java jdk 1.8
  become: yes
  yum: name=java-1.8.0-openjdk state=present

- name: Install Curl
  become: yes
  yum: name=curl state=present
Jenkins plugins role
- name: Install Jenkins Plugins
  with_items:
  - name: cvs
  - name: dashboard-view
  - name: external-monitor-job
  - name: durable-task
  - name: git
  - name: git-client
  - name: git-server
  - name: github-api
  - name: ghprb
  - name: javadoc
  - name: junit
  - name: ldap
  - name: mailer
  - name: maven-plugin
  - name: pam-auth
  - name: plain-credentials
  - name: publish-over-ssh
  - name: ssh-agent
  - name: ssh-credentials
  - name: ssh-slaves
  - name: ssh-credentials
  - name: swarm
  get_url: dest="{{ jenkins_home }}/plugins/{{ item.name | mandatory }}.jpi"
            url="https://updates.jenkins-ci.org/latest/{{ item.name }}.hpi"
            owner=jenkins group=jenkins mode=0644
  notify: Restart Jenkins
Jenkins-ci role
---
- name: Setup jenkins repo
  become: yes
  get_url:
    url: "{{ jenkins_repo_url }}"
    dest: /etc/yum.repos.d/jenkins.repo

- name: Add repo GPG key
  become: yes
  rpm_key:
    state: present
    key: "{{ jenkins_repo_key_url }}"

- name: Make sure jenkins is installed and enabled
  become: yes
  yum: name=jenkins state=installed
Playbook
---
- name: Configure Jenkins
  hosts: ci-integration
  remote_user: vagrant
  roles:
    - jenkins_deps
    - jenkins-ci
    - jenkins_plugins

- name: Configure Build
  hosts: build-server
  remote_user: vagrant
  roles:
    - build
You can find the project under my Github (https://github.com/kalilou/ansible-example)
Now let's dive into the demo. Clone the git repo. I will assume you've installed Git, Ansible, Vagrant and VirtualBox
$ git clone https://github.com/kalilou/ansible-example.git
$ cd ansible-example/jenkins-build
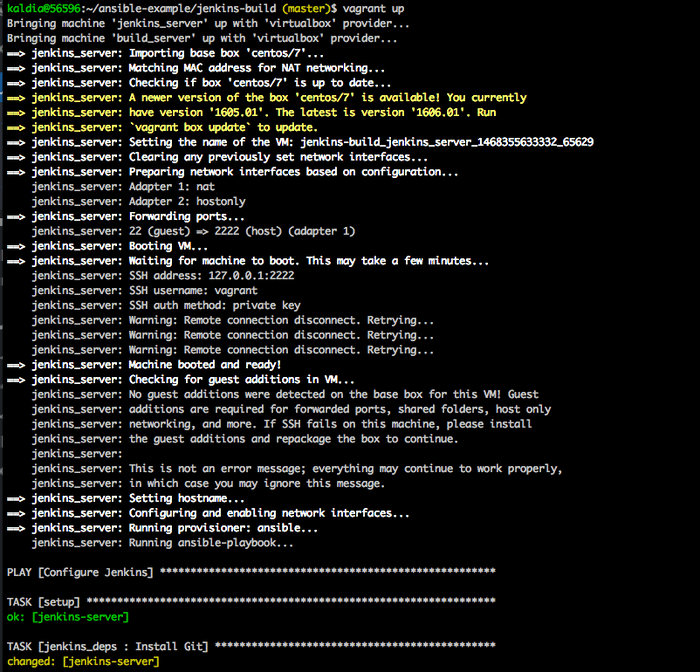
$ vagrant up
Outputs
Vagrant bringing up the VMs
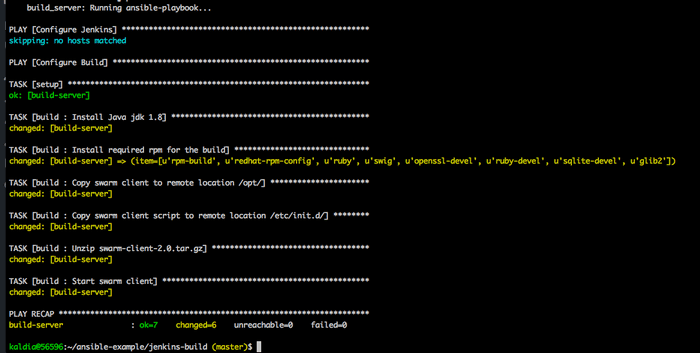
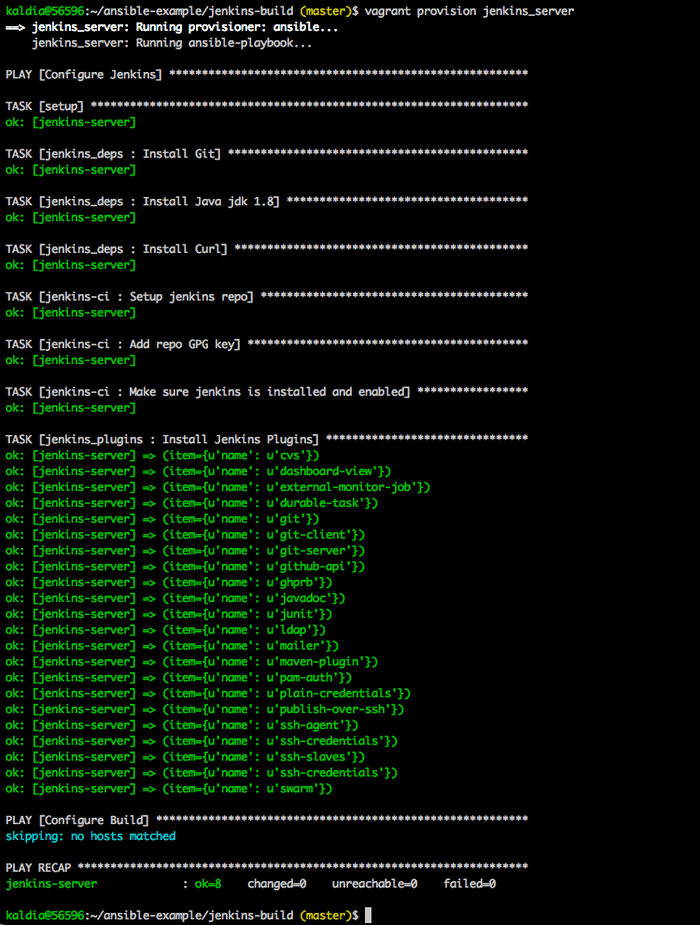
Vagrant provisioning the machines via Ansible
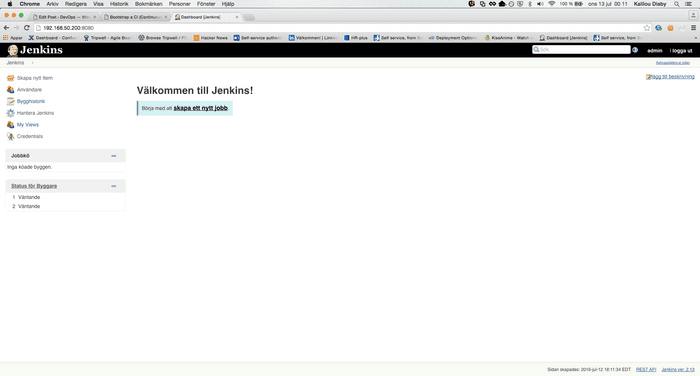
Check out Jenkins server on http://192.168.50.200:8080/ and you should the interface below:
Useful commands
$ vagrant ssh jenkins_server # ssh to the Jenkins server
$ vagrant ssh build_server   # ssh to the build server
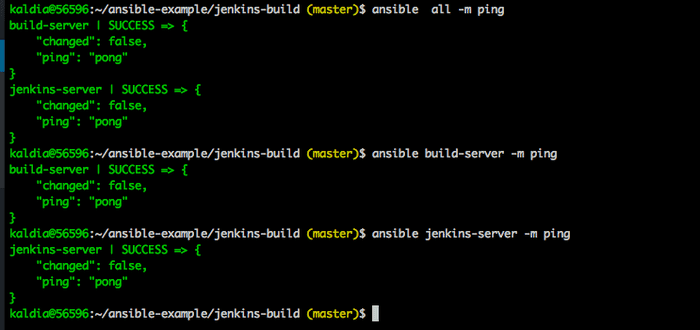
Use ansible to ping all your VMs (You can also ping a specific machine $ ansible jenkins-server -m ping or $ ansible build-server -m ping or $ ansible all -m ping
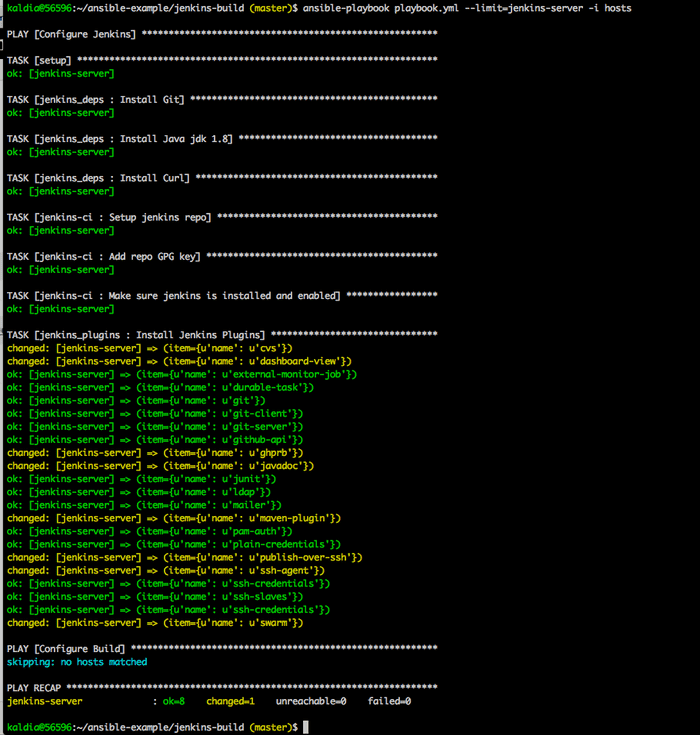
Now let's provision Jenkins server with Ansible $ ansible-playbook playbook.yml --limit=jenkins-server -i hosts
The same command with vagrant will give the same output $ vagrant provision jenkins_server
In order to make the swarm plugin works, let's changes some settings on Jenkins. In this tutorial, I will allow anyone to access Jenkins but for real use cases, please think about the security, who can access Jenkins or not.
On Jenkins interface, click on Configure Global Security and check the box which says allow "Anyone can do anything" and check the box random for where it says "TCP port for JNLP agents". Then now ssh to the build-server by running the shell commands
$ vagrant ssh build_server
$ sudo /usr/bin/java -jar /opt/swarm-client-2.0/swarm-client-2.0-jar-with-dendencies.jar -master http://192.168.50.200:8080 -fsroot /home/vagrant -name build-server -executors 1
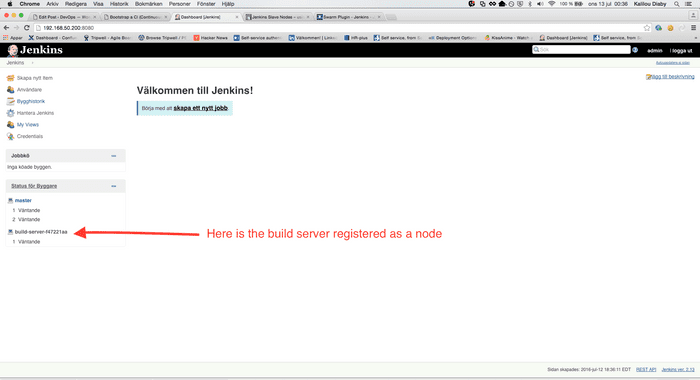
Now the build-server should be registered as node to the Jenkins server as shown on the picture below:
Hope you've find this tutorial helpful, don't hesitate to drop a comment if you need any help.


